Hyundai Ioniq (AE): SRSCM / Side Impact Sensor (SIS). Repair procedures
Hyundai Ioniq (AE) 2017-2022 Service & Repair Manual / Restraint / SRSCM / Side Impact Sensor (SIS). Repair procedures
| Removal |
[Pressure Side Impact Sensor]
|

| 1. | Disconnect the battery negative cable, and wait for at least three minutes before beginning work. |
| 2. | Remove the front door trim. (Refer to Body - "Front Door Trim") |
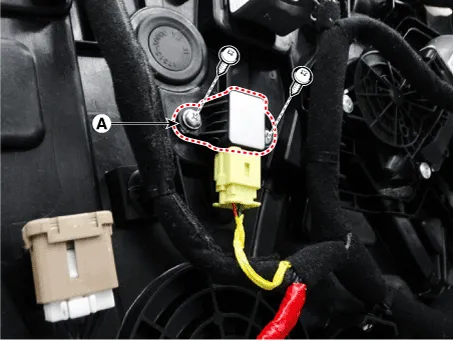
| 3. | Disconnect the pressure side impact sensor connector (A).
|

| 4. | Remove the side impact sensor (A) after loosening the side impact sensor mounting screws.
|
[Gravity Side Impact Sensor]
| 1. | Disconnect the battery negative cable and wait for at least three minutes before beginning work. |
| 2. | Remove the center pillar trim. (Refer to Body - "Interior Trim") |
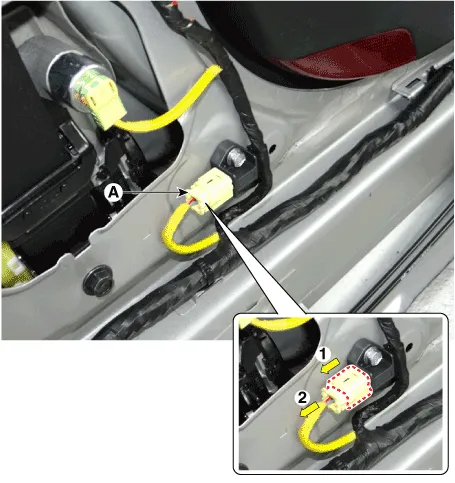
| 3. | Disconnect the side impact sensor connector (A).
|
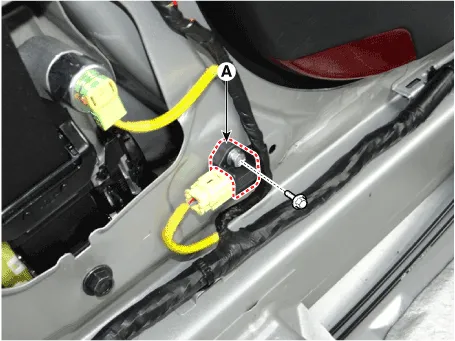
| 4. | Remove the side impact sensor (A) after loosening the side impact sensor mounting bolt.
|
| Installation |
[Pressure Side Impact Sensor]
| 1. | Install the pressure side impact sensor with the screw then connect the pressure side impact sensor connector.
|
| 2. | Install the front door trim. (Refer to Body - "Front Door Trim") |
| 3. | Reconnect the battery negative cable. |
| 4. | After installing the pressure side impact sensor, confirm proper system operation:
|
[Gravity Side Impact Sensor]
|
| 1. | Install the side impact sensor with the bolt then connect the side impact sensor connector.
|
| 2. | Install the door scuff trim. (Refer to Body - "Interior Trim") |
| 3. | Reconnect the battery negative cable. |
| 4. | After installing the Side Impact Sensor, confirm proper system operation : Turn the ignition switch ON; the SRS indicator light should be turned on for about six seconds and then go off. |
Components1. Front Pressure Side Impact Sensor (P-SIS)2. Front Gravity Side Impact Sensor (G-SIS)
Other information:
Hyundai Ioniq (AE) 2017-2022 Service & Repair Manual: Parking Distance Warning (PDW) Sensor. Repair procedures
Removal1.Disconnect the negative (-) battery terminal.2.Remove the front / rear bumper cover.(Refer to Body - "Front Bumper Cover")(Refer to Body - "Rear Bumper Cover")3.Disconnect the connector (A) from the parking assist sensor.4.Remove the sensor (A) by pulling out both ends of the sensor holder.
Hyundai Ioniq (AE) 2017-2022 Service & Repair Manual: Cruise Control Switch. Repair procedures
Removal1.Disconnect the negative (-) battery terminal.2.Remove the steering wheel assembly.(Refer to Steering System - "Steering Wheel")3.Remove the steering back cover (A).4.Remove the steering remote control connector (A).5.Remove the steering remote control after loosening the screws.
Categories
- Manuals Home
- Hyundai Ioniq Owners Manual
- Hyundai Ioniq Service Manual
- Jump starting procedure
- Hybrid Control System
- Normal Maintenance Schedule
- New on site
- Most important about car

Copyright © 2026 www.hioniqae.com - 0.0124