Hyundai Ioniq (AE): Maintenance / Climate Control Air Filter
Filter Inspection
The climate control air filter should be replaced according to the Maintenance Schedule. If the vehicle is operated in severely air-polluted cities or on dusty rough roads for a long period, it should be inspected more frequently and replaced earlier. When you replace the climate control air filter, replace it performing the following procedure, and be careful to avoid damaging other components.

1. With the glove box open, remove the stoppers on both sides.
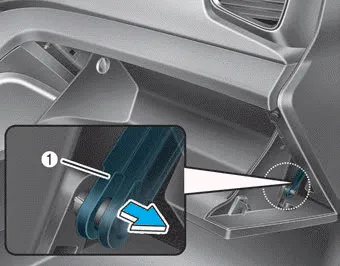
2. Remove the support rod (1).
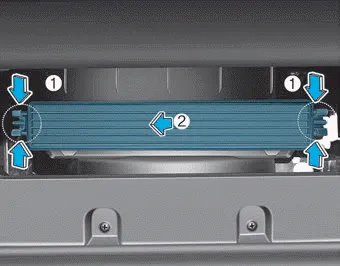
3. Press and hold the lock (1) on both sides of the cover.
4. Pull out (2) the cover.
5. Replace the climate control air filter.
6. Reassemble in the reverse order of disassembly.
NOTICE
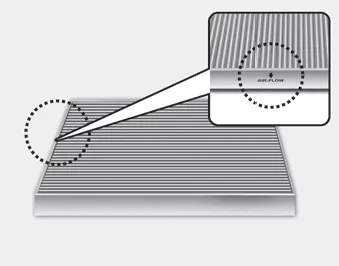
Install a new climate control air filter in the correct direction with the arrow symbol (↓) facing downwards, otherwise, it may be noisy and the effectiveness of the filter may be reduced.
Filter Replacement The air cleaner filter can be cleaned for inspection using compressed air. Do not attempt to wash or to rinse it, as water will damage the filter.
Blade Inspection Contamination of either the windshield or the wiper blades with foreign matter can reduce the effectiveness of the windshield wiper functionality.
Other information:
Hyundai Ioniq (AE) 2017-2022 Service & Repair Manual: Climate Control Air Filter. Repair procedures
Replacement1.Disconnect the air damper (A) from the glove box (B).2.Remove the stopper (B) from the glove box (A).3.Remove the filter cover (A) by pressing the knob.4.Replace the air filter (A) with a new one according to the direction of air filter. • To remove the filter easily, press the right side inwa
Hyundai Ioniq (AE) 2017-2022 Service & Repair Manual: Front Radar Unit. Description and operation
DescriptionThe smart cruise control unit is installed on the front right side of the chassis. A radar sensor is embedded in the front section of the unit. This sensor detects vehicles and objects in front of the vehicle. The radar sensor can detect up to 64 objects ahead of a vehicle.
Categories
- Manuals Home
- Hyundai Ioniq Owners Manual
- Hyundai Ioniq Service Manual
- Repair procedures
- Brake System
- General Information
- New on site
- Most important about car
