Hyundai Ioniq (AE): Interior Trim / Cowl Side Trim. Repair procedures
Hyundai Ioniq (AE) 2017-2022 Service & Repair Manual / Body (Interior and Exterior) / Interior Trim / Cowl Side Trim. Repair procedures
| Replacement |
|

|

| 1. | Remove the front door scuff trim. (Refer to Interior Trim - "Door Scuff Trim") |
| 2. | Remove the hood latch release handle. (Refer to Hood - "Hood Latch Release Handle") |
| 3. | Carefully remove the front door body side weatherstrip. |
| 4. | Using a screwdriver or remover, remove the cowl side trim (A).
|
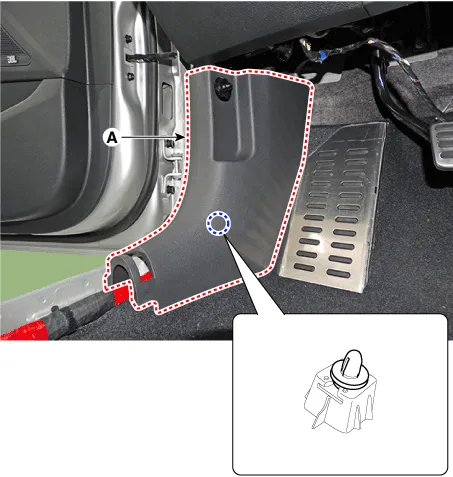
| 5. | To install, reverse the removal procedure.
|

Component Location 1. Cowl side trim
Component Location 1. Front pillar trim
Other information:
Hyundai Ioniq (AE) 2017-2022 Service & Repair Manual: emperature Control Actuator. Repair procedures
Inspection1.Turn the ignition switch OFF.2.Disconnect the temperature control actuator connector.3.Verify that the temperature control actuator operates to the cool position when connecting 12V to terminal 3 and grounding terminal 7.Verify that the temperature control actuator operates to the warm position when connected in reverse.
Hyundai Ioniq (AE) 2017-2022 Service & Repair Manual: Front Radar Unit. Repair procedures
Removal1.Remove the front bumper.(Refer to Body - "Front Bumper")2.Disconnect the smart cruise control unit connector (A).3.Remove the smart cruise control nuit assembly (B) from thevehicle after loosening mounting bolts.Installation1.Install in the reverse order of removal.
Categories
- Manuals Home
- Hyundai Ioniq Owners Manual
- Hyundai Ioniq Service Manual
- Transmission Gear Oil. Repair procedures
- Hybrid Vehicle Engine Compartment
- Suspension System
- New on site
- Most important about car

Copyright © 2026 www.hioniqae.com - 0.0228