Hyundai Ioniq (AE): Interior Trim / Rear Wheel House Trim. Repair procedures
Hyundai Ioniq (AE) 2017-2022 Service & Repair Manual / Body (Interior and Exterior) / Interior Trim / Rear Wheel House Trim. Repair procedures
| Replacement |
|

|

| 1. | Remove the rear seat cushion assembly. (Refer to Rear Seat - "Rear Seat Assembly") |
| 2. | Remove the rear seat back assembly. (Refer to Rear Seat - "Rear Seat Assembly") |
| 3. | Slighty remove the rear door weatherstrip. |
| 4. | Remove the rear door scuff trim. (Refer to Interior Trim - "Door Scuff Trim") |
| 5. | Using a screwdriver or remover, remove the rear wheel house trim (A).
|
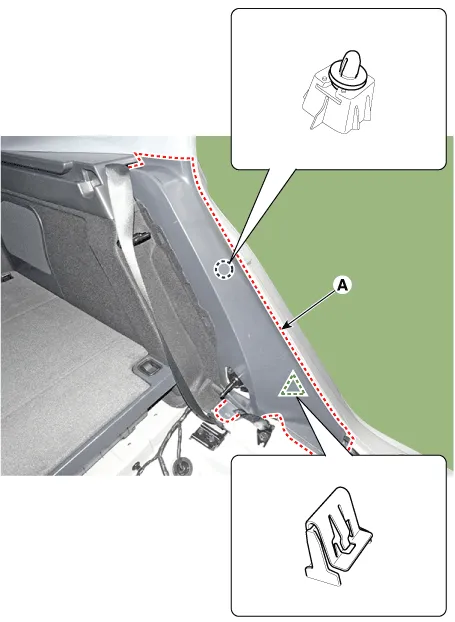
| 6. | To install, reverse the removal procedure.
|

Component Location 1. Rear wheel house
Other information:
Hyundai Ioniq (AE) 2017-2022 Service & Repair Manual: Smart Cruise Control (SCC) Switch. Components and components location
C
Hyundai Ioniq (AE) 2017-2022 Service & Repair Manual: Troubleshooting
Trouble Symptom ChartsTrouble Symptom 1Trouble Symptom 2 Trouble symptom Probable cause Remedy The set vehicle speed varies greatly upward or downward"Surging" (repeated alternating acceleration and deceleration) occurs after settingMalfunction of the vehicle speed se
Categories
- Manuals Home
- Hyundai Ioniq Owners Manual
- Hyundai Ioniq Service Manual
- Jump Starting
- General Information
- Maintenance
- New on site
- Most important about car

Copyright © 2026 www.hioniqae.com - 0.0177