Hyundai Ioniq (AE): Roof Trim / Roof Trim Assembly. Repair procedures
Hyundai Ioniq (AE) 2017-2022 Service & Repair Manual / Body (Interior and Exterior) / Roof Trim / Roof Trim Assembly. Repair procedures
| Replacement |
|

|

| 1. | Remove the front seat. (Refer to Front Seat - "Front Seat Assembly") |
| 2. | Remove the rear seat. (Refer to Rear Seat - "Rear Seat Assembly") |
| 3. | Remove the front pillar trim. (Rear to Interior Trim - "Front Pillar Trim") |
| 4. | Remove the canter pillar lower trim. (Rear to Interior Trim - "Center Pillar Trim") |
| 5. | Remove the canter pillar upper trim. (Rear to Interior Trim - "Center Pillar Trim") |
| 6. | Remove the rear pillar trim. (Rear to Interior Trim - "Rear Pillar Trim") |
| 7. | Remove the sunvisor and retainer. (Rear to Roof Trim - "Sunvisor") |
| 8. | Remove the assist handle. (Rear to Roof Trim - "Assist Handle") |
| 9. | Remove the overhead console lamp. (Rear to Body Electrical System - "Overhead Console Lamp") |
| 10. | Remove the room lamp. (Rear to Body Electrical System - "Room Lamp") |
| 11. | Disconnect the ECM mirror connector. (Refer to Body Electrical System - "Electro Chromic Inside Rear View Mirror") |
| 12. | Disconnect the rain sensor connector. (Refer to Body Electrical System - "Rain Sensor") |
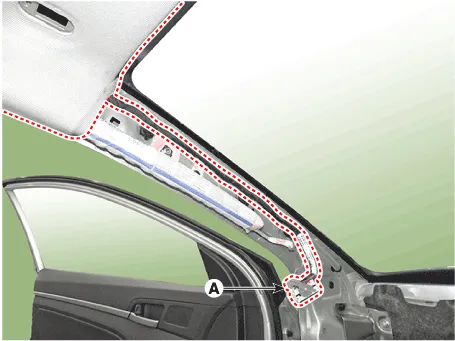
| 13. | Disconnect the roof trim main connector (A) and the mounting clips in the front pillar.
|
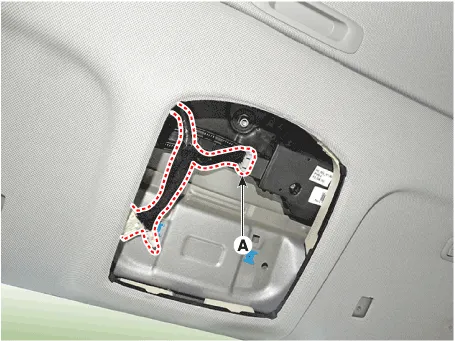
| 14. | Disconnect the sunroof motor connector (A).
|
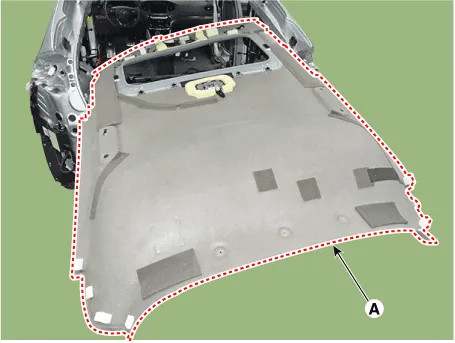
| 15. | Remove the roof trim mounting clip and remove the roof trim assembly (A).
|

| 16. | Remove the roof trim assembly (A) from the body panel and then carry it out of the vehicle through the rear door.
|
| 17. | Remove the vanity lamp. (Refer to Body Electrical - "Vanity Lamp') |
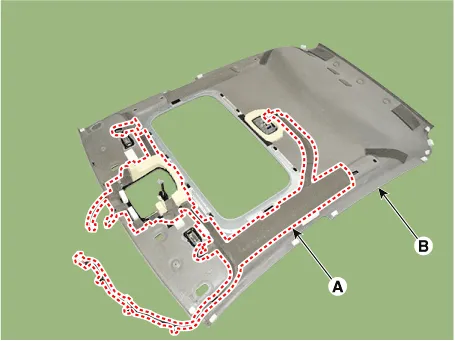
| 18. | Remove roof trim wiring harness (A) from the roof trim (B).
|

| 19. | To install, reverse the removal procedure.
|
Component Location 1. Roof Trim Assembly
Other information:
Hyundai Ioniq (AE) 2017-2022 Service & Repair Manual: Blower Motor. Repair procedures
Inspection1.Connect the battery voltage and check the blower motor rotation.2.If the blower motor does not operate well, substitute with a known-good blower motor and check for proper operation.3.Replace the blower motor if it is proved that there is a problem with it.
Hyundai Ioniq (AE) 2017-2022 Service & Repair Manual: Repair procedures
Diagnosis with GDS1.REAR CORENER RADAR system defects can be quickly diagnosed with the GDS. GDS operates actuator quickly to monitor, input/output value and self diagnosis.2.Connect the cable of GDS to the data link connector in driver side crash pad lower panel, turn the power on GDS.
Categories
- Manuals Home
- Hyundai Ioniq Owners Manual
- Hyundai Ioniq Service Manual
- Hybrid Vehicle Engine Compartment
- General Information
- Jump starting procedure
- New on site
- Most important about car

Copyright © 2026 www.hioniqae.com - 0.017