Hyundai Ioniq: Front Seat / Front Seat Cushion Cover. Repair procedures
Hyundai Ioniq (AE) 2017-2025 Service Manual / Body (Interior and Exterior) / Front Seat / Front Seat Cushion Cover. Repair procedures
| Replacement |
|

|

| 1. | Remove the front seat assembly. (Refer to Front Seat - "Front Seat Assembly") |
| 2. | Remove the front seat shield inner cover. (Refer to Front Seat - "Front Seat Inner Cover") |
| 3. | Remove the front seat shield outer cover. (Refer to Front Seat - "Front Seat Outer Cover") |
| 4. | Remove the front seat lower protector (A).
|
| 5. | Separate the clip and remove the air ventilation duct (A).
|
| 6. | Disconnect the front seat motor connectors (A).
|
| 7. | Remove the protector (A) from the front seat cushion frame. [Center]
[LH]
[RH]
|
| 8. | Remove the front seat cushion cover (A) from the front seat cushion frame.
|
| 9. | After removing the Velcro tape (A) and hog-ring clips (B) inside the front seat cushion cover, remove the seat cushion cover (C).
|
| 10. | To install, reverse the removal procedure.
|


Other information:
Hyundai Ioniq (AE) 2017-2025 Service Manual: Components and components location
C..
Hyundai Ioniq (AE) 2017-2025 Service Manual: Water pump. Repair procedures
Removal1.Loosen the drain plug, and drain the engine coolant. Remove the reservoir cap to help drain the coolant faster.(Refer to Cooling System - "Coolant")2.Remove the drive belt.(Refer to Timing System - "Drive Belt")3.Remove the water pump pulley (A)...
Categories
- Manuals Home
- 1st Generation Ioniq Owners Manual
- 1st Generation Ioniq Service Manual
- Child-Protector Rear Door Locks
- Immobilizer System
- Jump Starting
- New on site
- Most important about car
Hybrid Vehicle Interior Overview
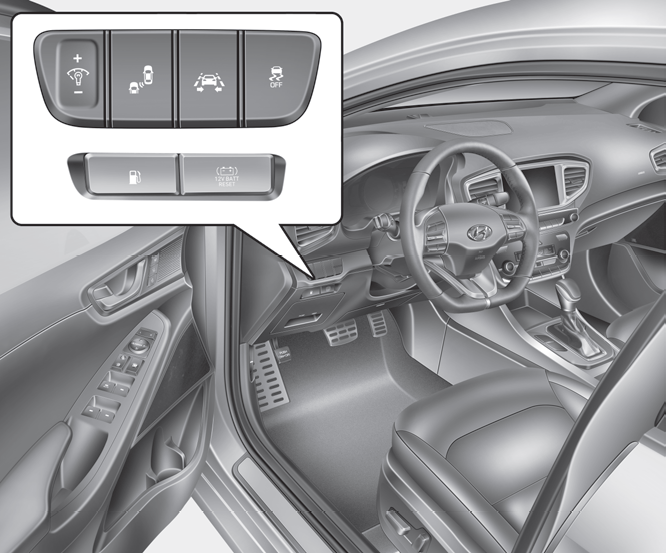
1. Door lock/unlock button
2. Driver position memory system
3. Side view mirror control switch
4. Central door lock switch

Copyright © 2025 www.hioniqae.com