Hyundai Ioniq (AE): SRSCM / Side Impact Sensor (SIS). Repair procedures
Hyundai Ioniq (AE) 2017-2022 Service & Repair Manual / Restraint / SRSCM / Side Impact Sensor (SIS). Repair procedures
| Removal |
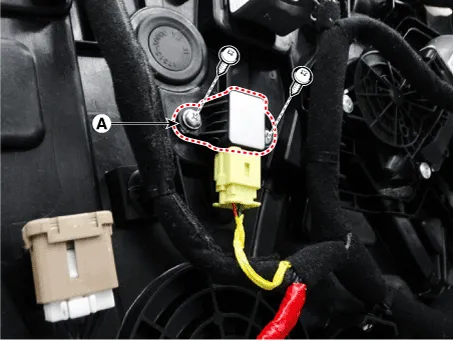
[Pressure Side Impact Sensor]
|

| 1. | Disconnect the battery negative cable, and wait for at least three minutes before beginning work. |
| 2. | Remove the front door trim. (Refer to Body - "Front Door Trim") |
| 3. | Disconnect the pressure side impact sensor connector (A).
|

| 4. | Remove the side impact sensor (A) after loosening the side impact sensor mounting screws.
|
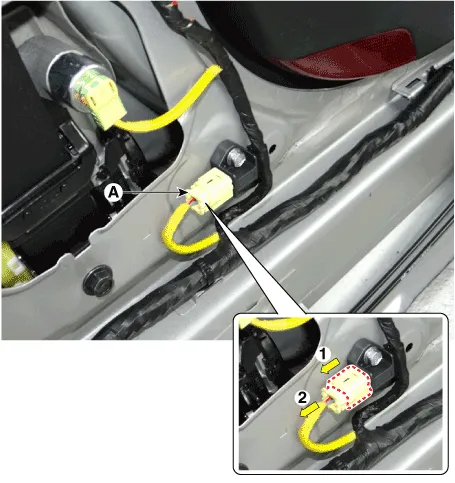
[Gravity Side Impact Sensor]
| 1. | Disconnect the battery negative cable and wait for at least three minutes before beginning work. |
| 2. | Remove the center pillar trim. (Refer to Body - "Interior Trim") |
| 3. | Disconnect the side impact sensor connector (A).
|
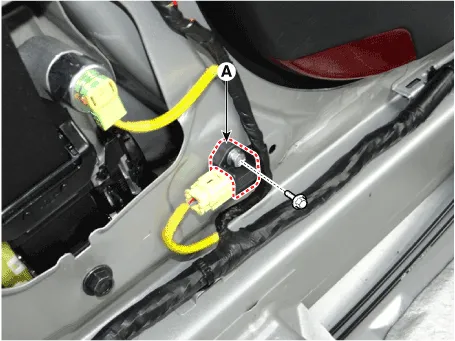
| 4. | Remove the side impact sensor (A) after loosening the side impact sensor mounting bolt.
|
| Installation |
[Pressure Side Impact Sensor]
| 1. | Install the pressure side impact sensor with the screw then connect the pressure side impact sensor connector.
|
| 2. | Install the front door trim. (Refer to Body - "Front Door Trim") |
| 3. | Reconnect the battery negative cable. |
| 4. | After installing the pressure side impact sensor, confirm proper system operation:
|
[Gravity Side Impact Sensor]
|
| 1. | Install the side impact sensor with the bolt then connect the side impact sensor connector.
|
| 2. | Install the door scuff trim. (Refer to Body - "Interior Trim") |
| 3. | Reconnect the battery negative cable. |
| 4. | After installing the Side Impact Sensor, confirm proper system operation : Turn the ignition switch ON; the SRS indicator light should be turned on for about six seconds and then go off. |
Components1. Front Pressure Side Impact Sensor (P-SIS)2. Front Gravity Side Impact Sensor (G-SIS)
Other information:
Hyundai Ioniq (AE) 2017-2022 Service & Repair Manual: In-car Sensor. Description and operation
DescriptionThe In-car air temperature sensor is built in the heater & A/C control unit.The sensor contains a thermistor which measures the temperature of the inside. The signal decided by the resistance value which changes in accordance with perceived inside temperature, is delivered to heater control unit and according to this signal the contr
Hyundai Ioniq (AE) 2017-2022 Service & Repair Manual: Warning Indicator. Components and components location
C
Categories
- Manuals Home
- Hyundai Ioniq Owners Manual
- Hyundai Ioniq Service Manual
- Brake System
- General Information
- Suspension System
- New on site
- Most important about car

Copyright © 2026 www.hioniqae.com - 0.0196