Hyundai Ioniq (AE): Interior Trim / Door Scuff Trim. Repair procedures
Hyundai Ioniq (AE) 2017-2022 Service & Repair Manual / Body (Interior and Exterior) / Interior Trim / Door Scuff Trim. Repair procedures
| Replacement |
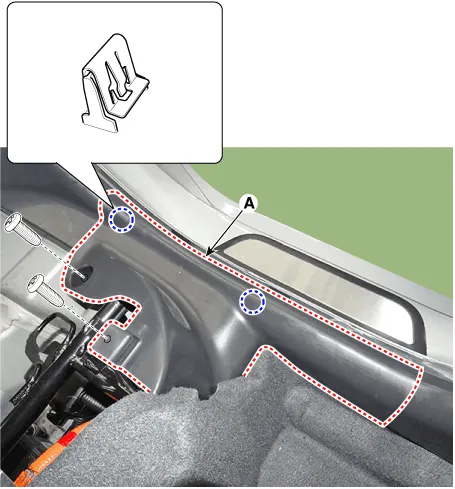
| [Front door scuff trim] |
|

|

| 1. | Using a screwdriver or remover, remove the front door scuff trim (A).
|
| 2. | To install, reverse the removal procedure.
|

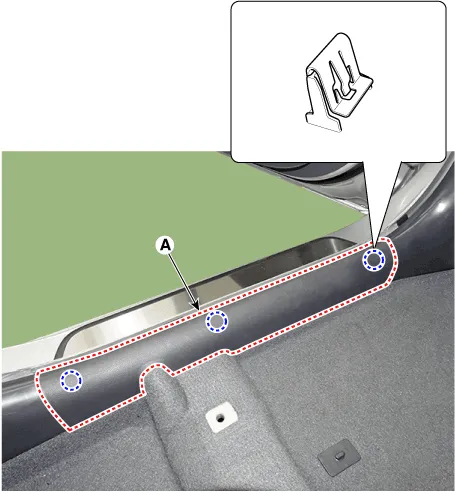
| [Rear door scuff trim] |
|
|
| 1. | Remove the rear seat cushion assembly. (Refer to Rear Seat - "Rear Seat Assembly") |
| 2. | Loosen the mounting screws and remove the rear door scuff trim (A).
|
| 3. | To install, reverse the removal procedure.
|
Component Location 1. Front door scuff trim2. Rear door scuff trim
Component1. Front door step trim 2. Rear door step trim
Other information:
Hyundai Ioniq (AE) 2017-2022 Service & Repair Manual: High voltage shut-off procedures
High Voltage Shut-off Procedures • Be sure to read and follow the "General Safety Information and Caution" before doing any work related with the high voltage system. Failure to follow the safety instructions may result in serious electrical injuries.
Hyundai Ioniq (AE) 2017-2022 Service & Repair Manual: Front View Camera Unit. Repair procedures
Removal1.Disconnect the negative (-) battery terminal.2.Remove the front view camera cover (A).3.Disconnect the front view camera connector (A).4.Remove the front view camera after disengaging the mounting bracket (A).Installation1.Align front view camera with windshield bracket using forward edge point (A).
Categories
- Manuals Home
- Hyundai Ioniq Owners Manual
- Hyundai Ioniq Service Manual
- Transmission Gear Oil. Repair procedures
- If the 12 Volt Battery is Discharged (Hybrid Vehicle)
- Brake System
- New on site
- Most important about car

Copyright © 2026 www.hioniqae.com - 0.0186