
Hyundai Ioniq (AE): With Tire Mobility Kit (TMK) - Type A / Components of the Tire Mobility Kit
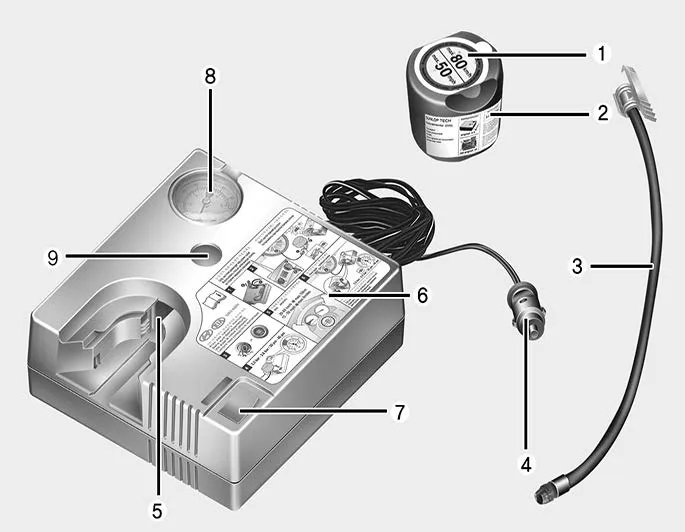
1. Speed restriction label
2. Sealant bottle and label with speed restriction
3. Filling hose from sealant bottle to wheel
4. Connectors and cable for power outlet direct connection
5. Holder for the sealant bottle
6. Compressor
7. ON/OFF switch
8. Pressure gauge for displaying the tire inflation pressure
9. Button for reducing tire inflation pressure
Connectors, cable and connection hose are stored in the compressor housing.
Strictly follow the specified sequence, otherwise the sealant may escape under high pressure.
WARNING
Do not use the tire sealant after the sealant has expired (i.e. pasted the expiration date on the sealant container). This can increase the risk of tire failure.
WARNING
- Keep out of reach of children.
- Avoid contact with eyes.
- Do not swallow.
With the Tire Mobility Kit you stay mobile even after experiencing a tire puncture. The compressor and sealing compound system effectively and comfortably seals most punctures in a passenger car tire caused by nails or similar objects and reinflates the tire.
CAUTION Detach the speed restriction label (1) from the sealant bottle (2), and place it in a highly visible place inside the vehicle such as on the steering wheel to remind the driver not to drive too fast.
Other information:
Hyundai Ioniq (AE) 2017-2022 Service & Repair Manual: In-car Sensor. Repair procedures
Diagnosis With GDS1.The heating, ventilation and air conditioning can be quickly diagnosed failed parts with vehicle diagnostic system (GDS).※ The diagnostic system (GDS) provides the following information.(1) Self diagnosis : Checking the failure code (DTC) and display.
Hyundai Ioniq (AE) 2017-2022 Service & Repair Manual: Heater Unit. Repair procedures
Replacement When prying with a flat-tip screwdriver or use a prying trim tool, wrap it with protective tape, and apply protective tape around the related parts, to prevent damage.1.Disconnect the negative (-) battery terminal.2.Recover the refrigerant with a recovery / recycling / charging station.
Categories
- Manuals Home
- Hyundai Ioniq Owners Manual
- Hyundai Ioniq Service Manual
- Transmission Gear Oil. Repair procedures
- Engine Clutch System
- Jump starting procedure
- New on site
- Most important about car
