Hyundai Ioniq (AE): AVN System / External AMP. Repair procedures
| Removal |
| 1. | Disconnect the negative (-) battery terminal. |
| 2. | Open the trunk, remove the right luggage side trim. (Refer to Body - "Luggage Side Trim") |
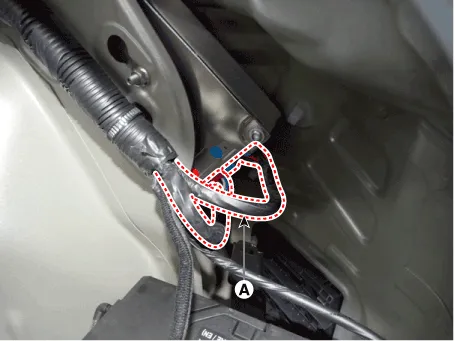
| 3. | Remove the external amplifier after disconneting the connector (A) and loosening the mounting nuts.
|

| Installation |
| 1. | Install the external amplifier after connecting the connector. |
| 2. | Install the right luggage side trim. |
| 3. | Connect the negative (-) battery terminal.
|

Components NO Connector A NO Connector B 1BATT (+)1Subwoofer 2 (+)2BATT (+)2Subwoofer 1 (+)3BATT (+)3Front door tweeter speaker - RH (+)4BATT (+)4Front door tweeter speaker - LH (+)5-5-6Multimedia CAN (High)6-7Multimedia CAN (Low)7-8ACC8-9Navigation voice (+)9-10-10-11-11-12-12Rear door speaker - RH (+)13-13Rear door speaker - LH (+)14-14Center speaker (+)15-15 -16Ground16Subwoofer 2 (-)17Ground17Subwoofer 1 (-)18Ground18Front door tweeter speaker - RH (-) 19Ground19Front door tweeter speaker - LH (-)20SPDIF (High)20-21SPDIF (Low)21-22SPDIF GND22-23Navigation voice (-)23-24-24-25-25Rear door speaker - RH (-)26-26Rear door speaker - LH (-) 27-27Center speaker (+)28-28 -
Components1. Left Remote Control Switch (Audio + Hands free)2. Right Remote Control Switch(Cruise+Trip Computer)
Other information:
Hyundai Ioniq (AE) 2017-2022 Service & Repair Manual: Description and operation
DescriptionRear corner radar is a system that uses two magnetic wave radar sensors attached on the rear panel to measure the distance from the following vehicles and provides the sensing and (visual and auditory) alarm of any vehicle coming into the blind spot.
Hyundai Ioniq (AE) 2017-2022 Service & Repair Manual: Specifications
S
Categories
- Manuals Home
- Hyundai Ioniq Owners Manual
- Hyundai Ioniq Service Manual
- Jump starting procedure
- Repair procedures
- Engine Clutch System
- New on site
- Most important about car
