Hyundai Ioniq (AE): Cooling System / Cooling Fan. Repair procedures
Hyundai Ioniq (AE) 2017-2022 Service & Repair Manual / Engine Mechanical System / Cooling System / Cooling Fan. Repair procedures
| Removal and installation |
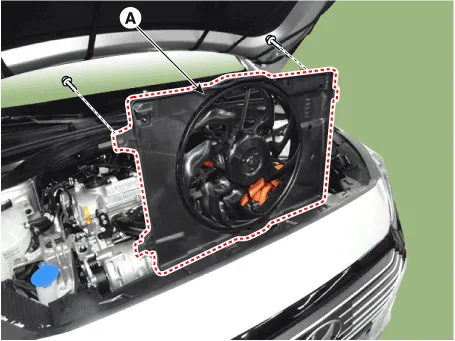
Cooling Fan Assembly
| 1. | Disconnect the battery negative terminal. |
| 2. | Remove the air cleaner assembly. (Refer to Intake and Exhaust System - "Air Cleaner") |
| 3. | Disconnect the hybrid starter generator (HSG) coolant hoses (A).
|

| 4. | Disconnect the wire harness connector (A).
|

| 5. | Remove the hood latch assembly. (Refer to Body - "Hood Latch") |
| 6. | Remove the cooling fan upper guard (A).
|

| 7. | Remove the cooling fan (A).
|
| 8. | Install in the reverse order of removal. |
Cooling Fan Controller (PWM)
| 1. | Disconnect the battery negative terminal. |
| 2. | Remove the air cleaner assembly. (Refer to Intake and Exhaust System - "Air Cleaner") |
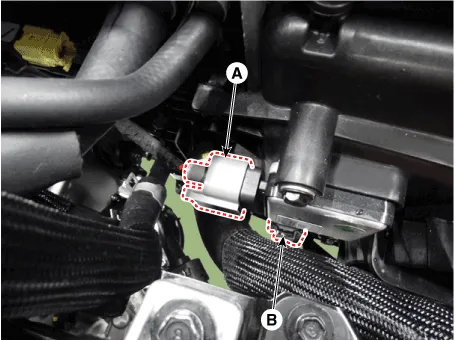
| 3. | Disconnect the wire harness connector (A) and the fan motor connector (B).
|
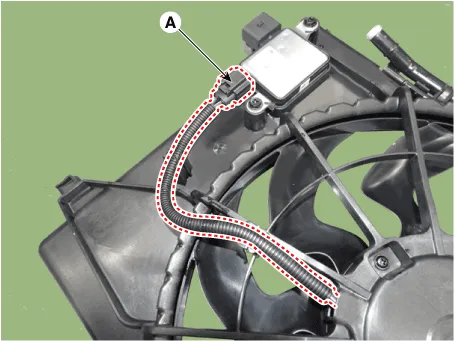
| 4. | Remove the cooling fan controller (PWM) (A) from the cooling fan shroud.
|

| 5. | Install in the reverse order of removal. |
| Disassembly |
| 1. | Remove the cooling fan (A) from the cooling fan assembly.
|

| 2. | Disconnect the fan motor connector (A) from the cooling fan controller (PWM).
|
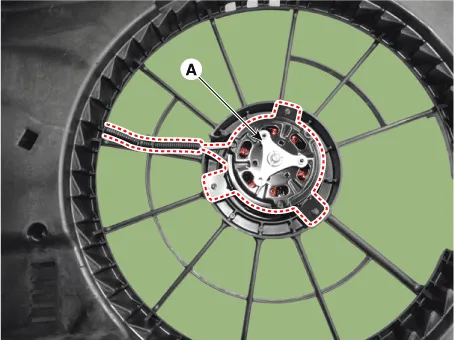
| 3. | Loosen the screws and then remove the fan motor (A) from the cooling fan shroud.
|
| 4. | Assemble in the reverse order of disassembly. |
| Inspection |
Fan Motor
| 1. | Disconnect the fan motor connector from the cooling fan controller (PWM). |
| 2. | Connect the battery voltage to the "+" terminal and ground to "-" terminal. |
| 3. | Check the cooling fan motor operates well. |
Schematic Diagrams
Components1. Radiator assembly2. Radiator upper mounting bracket3. Radiator lower hose4. Radiator upper hose5. Mounting insulator6. Clamp
Other information:
Hyundai Ioniq (AE) 2017-2022 Service & Repair Manual: Evaporator Temperature Sensor. Description and operation
DescriptionThe evaporator temperature sensor will detect the evaporator core temperature and interrupt compressor relay power in order to prevent evaporator from freezing by excessive cooling. The evaporator temperature sensor has the Negative Temperature Coefficient (NTC).
Hyundai Ioniq (AE) 2017-2022 Service & Repair Manual: Blower Unit. Repair procedures
Replacement When prying with a flat-tip screwdriver or use a prying trim tool, wrap it with protective tape, and apply protective tape around the related parts, to prevent damage.1.Disconnect the negative (-) battery terminal.2.Recover the refrigerant with a recovery / recycling / charging station.
Categories
- Manuals Home
- Hyundai Ioniq Owners Manual
- Hyundai Ioniq Service Manual
- How to Connect Portable Charger (ICCB: In-Cable Control Box)
- Checking the Coolant Level
- Suspension System
- New on site
- Most important about car

Copyright © 2026 www.hioniqae.com - 0.0163