Hyundai Ioniq: Hybrid Motor Assembly / Hybrid Drive Motor Assembly. Repair procedures
| 1. | Use the mΩ tester to check the line resistance.
Category
| Inspection area
| Inspection criteria
| Remarks
| Resistance
(Line
- Line)
| U - V
| 35.3 mΩ ± 5%
| Based on ambient temperature (20°C)
| V - W
| W - U
|
|
| 2. | Check the temperature sensor resistance.
Category
| Inspection area
| Inspection criteria
| Remarks
| Resistance
(Temperature
sensor)
| Pin 4 - 8
| 8kΩ (30°C / 86°F) - 20kΩ (10°C / 50°F)
| 10 - 30°C / 50 - 86°F
|
|
| 3. | Check the resolver sensor resistance.
Category
| Inspection area
| Inspection criteria
| Remarks
| Resistance
(Resolver
sensor)
| Pin 1 - 5
| 11.7 Ω ± 10%
| Based on ambient temperature (20°C)
| Pin 2 - 6
| 32 Ω ± 10%
| Pin 3 - 7
| 27 Ω ± 10%
|
|
| 4. | Perform the insulation test.
Category
| Inspection area
| Inspection criteria
| Remarks
| Insulation
(Housing,
cover)
| W - U - V
| 10 MΩ↑
| DC 540 V,
1 minute
| 2.5 mA↓
| AC 1600 V,
1 minute
| Position (resolver) sensor
| 100 MΩ↑
| DC 500 V,
1 minute
| Temperature sensor
| 100 MΩ↑
|
|
| 1. | Remove the double clutch transmission (DCT) from the vehicle. (Refer to DCT (Double Clutch Transmission) System - "Double Clutch Transmission".) |
| 2. | Remove the water pump (EWP) (A). Tightening torque : 18.6 - 23.5 N.m (1.9 - 2.4 kgf.m, 13.7 - 17.4 lb-ft) |
|
| 3. | Disconnect the reservoir hose (A). | •
| After disconnecting the hose, block the end to prevent the hydraulic fluid from leaking. |
| •
| Make sure that the hydraulic fluid does not drop on other components or your body. |
| •
| If the hydraulic fluid dropped on other components or your body, wash it immediately. |
|
|
| 4. | Remove the engine clutch actuator (B). Tightening torque : 21.6 - 26.5 N.m (2.2 - 2.7 kgf.m, 15.9 - 19.5 lb-ft) |
| •
| When connecting the reservoir hose to the actuator, make sure that the clamp does not interfere with other components. |
| •
| Completely remove the air from the engine clutch system. |
| •
| After installing the hose, place the clamp between the markings. |
| •
| Make sure that the reservoir hose does not get twisted after installation. |
| •
| After the installation, both wings of the clamp should face the front of the transmission. |
| •
| Make sure that no foreign substance, such as dust, does not get inside the hose during the transportation, storage and assembly of the components. |
|
|
| 5. | Remove the adaptor (A). 
| •
| Make sure that the O-ring is not damaged, scratched, or deformed while mounting the adaptor. |
|
|
| 6. | Remove the concentric sleeve cylinder (A). Tightening torque : 9.8 - 11.8 N.m (1.0 - 1.2 kgf.m, 7.2 - 8.2 lb-ft) |
|
| 7. | Unscrew the bolts and remove the motor assembly (A). Tightening torque : 42.2 - 53.9 N.m (4.3 - 5.5 kgf.m, 31.1 - 39.8 lb-ft) |
|
| 1. | To install, reverse the removal procedure. | •
| Before installing the engine clutch actuator, check the assembled state of the O-rings (A). 
|
| •
| After tightening bolts temporarily, tighten the bolt completely at the same time with regulation torque. |
|
|
| 2. | After replacing the Engine clutch actuator, operate the followings in order using GDS equipment. | (1) | Engine clutch inspection line learning and diagnostic information. 
|
| (2) | Removal of air from engine clutch hydraulic pressure line. | •
| When using a vacuum-pressure equipment to inject hydraulic fluid, the vacuum pressure should be no more than 2.5 torr and the injection pressure should be between 2.3 - 2.5 bars. |
| •
| If it is impossible to inject hydraulic fluid using the above condition, be sure to remove air from the hydraulic line of the engine clutch at a temperature between 0 - 40°C. |
|
|
| (3) | Engine clutch/motor resolver adaptation. 
|
| (4) | Stabilization of the engine clutch hardware transfer torque. 
|
|
Component location1. HPCU (Hybrid Power Control Unit)(LDC+MCU+HCU+Reservoir)2. Hybrid drive motor3. Hybrid starter generator (HSG)4. Electrical radiator5...
Component location1. HPCU (Hybrid Power Control Unit)(LDC+MCU+HCU+Reservoir)2. Hybrid drive motor3. Hybrid starter generator (HSG)4. Electrical radiator5...
Other information:
Replacement
•
When removing with a flat-tip screwdriver or remover, wrap protective tape around the tools to prevent damage to components. •
Put on glove to protect your hands.1.Remove the roof trim...
DescriptionThe smart cruise control system allows a driver to program the vehicle to control the speed and following distance by detecting the vehicle ahead without depressing the brake pedal and the accelerator pedal.1.Cruise speed control : The vehicle maintains the selected speed if there are not vehicles ahead...
Categories
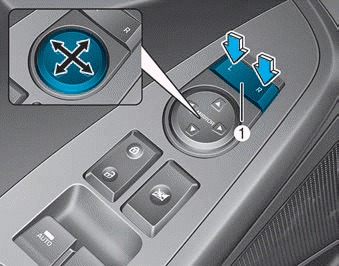
Adjusting the side mirrors:
1. Press either the L (driver's side) or R (passenger's side) button (1) to select
the side view mirror you would like to adjust.
read more


 Hybrid Drive Motor Assembly. Components and components location
 Hybrid Starter Generator(HSG). Components and components location