Hyundai Ioniq (AE): Rear Door / Rear Door Side Weatherstrip. Repair procedures
| Replacement |
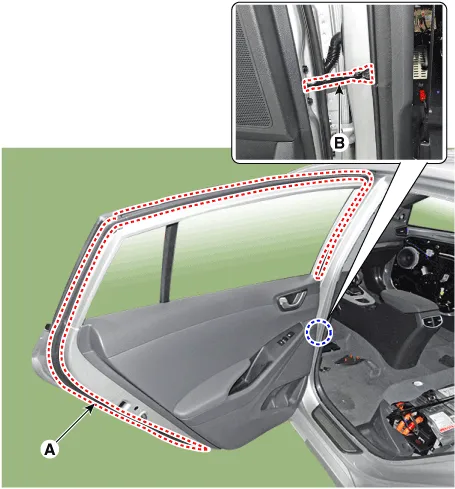
| [Rear door side weatherstrip] |
| 1. | Loosen the rear door checker (B) mounting bolt.
|
| 2. | Detach the clips, remove the rear door side weatherstrip (A).
|
| 3. | To install, reverse the removal procedure.
|

| [Front door body side weatherstrip] |
| 4. | Detach the clips, then remove the front door body side weatherstrip (A).
|
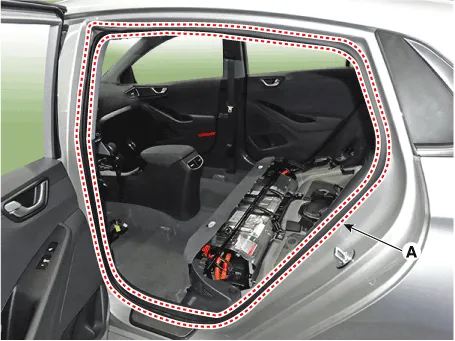
| 5. | To install, reverse the removal procedure.
|
Replacement1.Remove the rear door trim.(Refer to Rear Door - "Rear Door Trim")2.Remove the rear door belt inside weatherstrip (A).3.To install, reverse the removal procedure.
Other information:
Hyundai Ioniq (AE) 2017-2022 Service & Repair Manual: Description and operation
DescriptionIn ordinary cars, the mechanical water pump mounted on the engine for heating purposes is activated to circulate the cooling water, but in hybrid cars, AEWP is used to circulate the cooling water when the engine is not operating. Classification System Cooling water used
Hyundai Ioniq (AE) 2017-2022 Service & Repair Manual: Description and operation
DescriptionThe smart cruise control system allows a driver to program the vehicle to control the speed and following distance by detecting the vehicle ahead without depressing the brake pedal and the accelerator pedal.1.Cruise speed control : The vehicle maintains the selected speed if there are not vehicles ahead.
Categories
- Manuals Home
- Hyundai Ioniq Owners Manual
- Hyundai Ioniq Service Manual
- If the 12 Volt Battery is Discharged (Hybrid Vehicle)
- Front Disc Brake. Repair procedures
- Hybrid Control System
- New on site
- Most important about car
