
Hyundai Ioniq (AE): Rear Door / Rear Door Belt Inside Weatherstrip. Repair procedures
| Replacement |
| 1. | Remove the rear door trim. (Refer to Rear Door - "Rear Door Trim") |
| 2. | Remove the rear door belt inside weatherstrip (A).
|
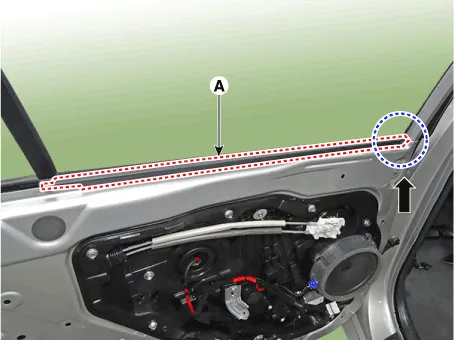
| 3. | To install, reverse the removal procedure.
|

Replacement1.Pull down the rear door window glass to the lowest level by pressing the power window glass switch.2.After loosening the mounting screws, remove the rear door belt outside weatherstrip (A).
Replacement[Rear door side weatherstrip]1.Loosen the rear door checker (B) mounting bolt. Tightening torque : 16.7 - 21.6 N.m (1.7 - 2.
Other information:
Hyundai Ioniq (AE) 2017-2022 Service & Repair Manual: Repair procedures
Replacement1.Remove the battery (-) terminal.2.Remove the engine room under cover.(Refer to Engine Mechanical System - "Engine Room Under Cover")3.Remove the heater hose (A) and AEWP hose (B).4.Disconnect the lock pin to remove the heater hose pump connector (A).
Hyundai Ioniq (AE) 2017-2022 Service & Repair Manual: Intake Actuator. Repair procedures
Inspection1.Turn the ignition switch OFF.2.Disconnect the intake actuator connector.3.Verify that the intake actuator operates to the fresh position when connecting 12V to terminal 3 and grounding terminal 4.Verify that the intake actuator operates to the recirculation position when connected in reverse.
Categories
- Manuals Home
- Hyundai Ioniq Owners Manual
- Hyundai Ioniq Service Manual
- Front Disc Brake. Repair procedures
- Troubleshooting
- Jump starting procedure
- New on site
- Most important about car
