Hyundai Ioniq (AE): Rear Door / Rear Door Side Weatherstrip. Repair procedures
Hyundai Ioniq (AE) 2017-2022 Service & Repair Manual / Body (Interior and Exterior) / Rear Door / Rear Door Side Weatherstrip. Repair procedures
| Replacement |
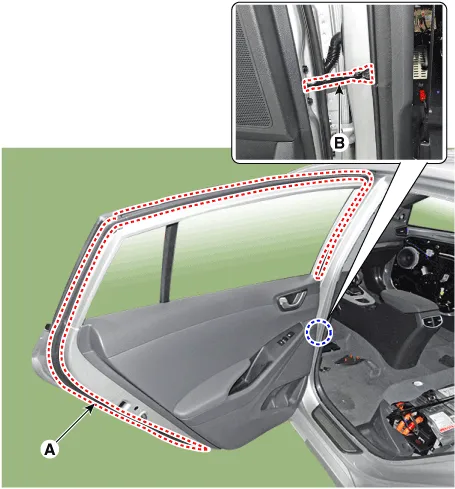
| [Rear door side weatherstrip] |
| 1. | Loosen the rear door checker (B) mounting bolt.
|
| 2. | Detach the clips, remove the rear door side weatherstrip (A).
|
| 3. | To install, reverse the removal procedure.
|

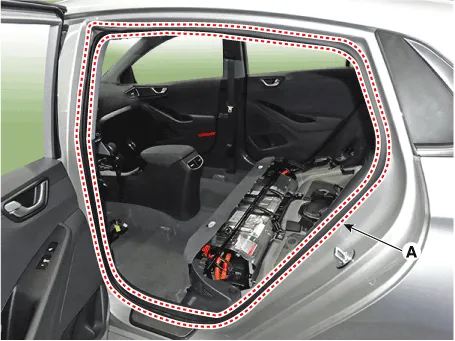
| [Front door body side weatherstrip] |
| 4. | Detach the clips, then remove the front door body side weatherstrip (A).
|
| 5. | To install, reverse the removal procedure.
|
Replacement1.Remove the rear door trim.(Refer to Rear Door - "Rear Door Trim")2.Remove the rear door belt inside weatherstrip (A).3.To install, reverse the removal procedure.
Other information:
Hyundai Ioniq (AE) 2017-2022 Service & Repair Manual: Evaporator Core. Repair procedures
Replacement1.Disconnect the negative (-) battery terminal. 2.Remove the heater and blower assembly.(Refer to Heater - "Heater Unit") 3.Remove the evaporator core cover (A) after loosening the mounting screws.4.Pull out the evaporator temperature sensor (A) from the evaporator core.
Hyundai Ioniq (AE) 2017-2022 Service & Repair Manual: Cruise Control Switch. Components and components location
C
Categories
- Manuals Home
- Hyundai Ioniq Owners Manual
- Hyundai Ioniq Service Manual
- Jump starting procedure
- How to Connect Portable Charger (ICCB: In-Cable Control Box)
- Engine Mechanical System
- New on site
- Most important about car

Copyright © 2026 www.hioniqae.com - 0.0132