Hyundai Ioniq (AE): Interior Trim / Rear Wheel House Trim. Repair procedures
Hyundai Ioniq (AE) 2017-2022 Service & Repair Manual / Body (Interior and Exterior) / Interior Trim / Rear Wheel House Trim. Repair procedures
| Replacement |
|

|

| 1. | Remove the rear seat cushion assembly. (Refer to Rear Seat - "Rear Seat Assembly") |
| 2. | Remove the rear seat back assembly. (Refer to Rear Seat - "Rear Seat Assembly") |
| 3. | Slighty remove the rear door weatherstrip. |
| 4. | Remove the rear door scuff trim. (Refer to Interior Trim - "Door Scuff Trim") |
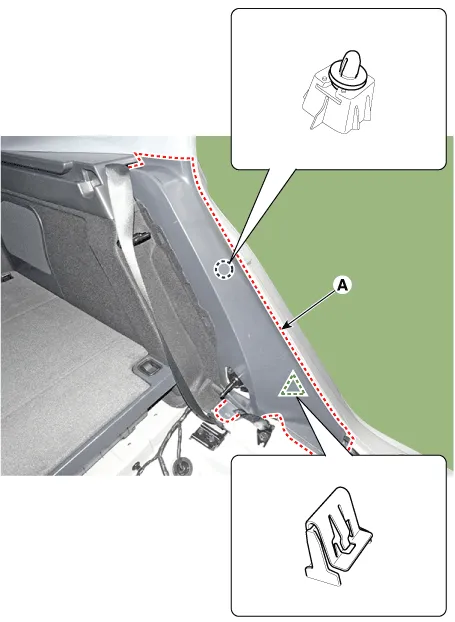
| 5. | Using a screwdriver or remover, remove the rear wheel house trim (A).
|
| 6. | To install, reverse the removal procedure.
|

Component Location 1. Rear wheel house
Other information:
Hyundai Ioniq (AE) 2017-2022 Service & Repair Manual: Evaporator Temperature Sensor. Repair procedures
Inspection1.Turn the ignition switch OFF.2.Disconnect the evaporator temperature sensor connector.3.Measure the resistance between terminal "+" and "-" of the evaporator temperature sensor.Specification Evaporator core temperature [°C (°F)] Resistance [KΩ]
Hyundai Ioniq (AE) 2017-2022 Service & Repair Manual: Description and operation
Cruise ControlThe cruise control system is engaged by the cruise "ON/OFF" main switch located on right of steering wheel column. The system has the capability to cruise, coast, accelerate and resume speed.It also has a safety interrupt, engaged upon depressing brake or shifting select lever.
Categories
- Manuals Home
- Hyundai Ioniq Owners Manual
- Hyundai Ioniq Service Manual
- Engine Mechanical System
- Brake System
- Theft-alarm System
- New on site
- Most important about car

Copyright © 2026 www.hioniqae.com - 0.0148