Hyundai Ioniq (AE): Sunroof / Repair procedures
| Adjustment |
| Inspect Glass Alignment |
| 1. | Inspect the step height between the roof panel (A) and the glass weatherstrip (B) and then adjust it if necessary.
|
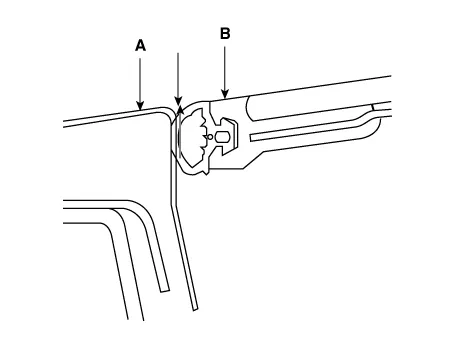
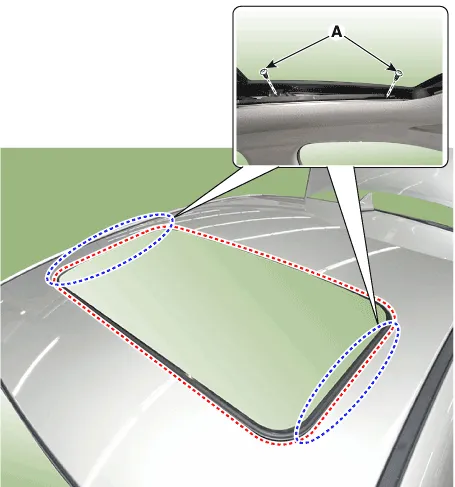
| 2. | Adjust the height of the glass by slighly loosening the screws (A).
|
| When To Initialize The Motor |
| 1. | After initial vehicle assembly. |
| 2. | If the initial value is erased or damaged because of short power electric discharge during operation. |
| 3. | After using the manual handle. |
| Operating The Sunroof Emergency Handle |
| 1. | Use the sunroof emergency handle to close or open the sunroof manually if the sunroof cannot be closed electronically due to motor or controller electrical malfunction.
|
| 2. | If needed, initialize the sunroof according to the initialization method. Whenever the vehicle battery is disconnected or discharged, or you use the emergency handle to operate the sunroof, you have to reset your sunroof system as follows :
|
Components1. Glass panel assembly2. Deflector3. Motor assembly4. Spring base assembly5. Seth plate assembly6. Guide assembly7. Frame sub assembly8. Seal tape9.
Components Location1. Sunroof glass
Other information:
Hyundai Ioniq (AE) 2017-2022 Service & Repair Manual: Description and operation
DescriptionRear corner radar is a system that uses two magnetic wave radar sensors attached on the rear panel to measure the distance from the following vehicles and provides the sensing and (visual and auditory) alarm of any vehicle coming into the blind spot.
Hyundai Ioniq (AE) 2017-2022 Service & Repair Manual: Description and operation
System OverviewParking Distance Warning (PDW) is an electronic driving aid that warns the driver to be cautious while parking or driving at low speed. The sensor uses ultrasonic waves to detect objects within proximity of the vehicle.PDW consists of four RPS sensors which are detecting the obstacles and transmit the result separated into three war
Categories
- Manuals Home
- Hyundai Ioniq Owners Manual
- Hyundai Ioniq Service Manual
- Engine Clutch System
- Hybrid Control System
- Transmission Gear Oil. Repair procedures
- New on site
- Most important about car
