Hyundai Ioniq (AE): Crankshaft Position Sensor (CKPS) / Repair procedures
| Inspection |
| 1. | Check signal waveform of CKPS and CMPS using a GDS.
|
| Removal |
| 1. | Turn ignition switch OFF and disconnect the negative (-) battery cable. |
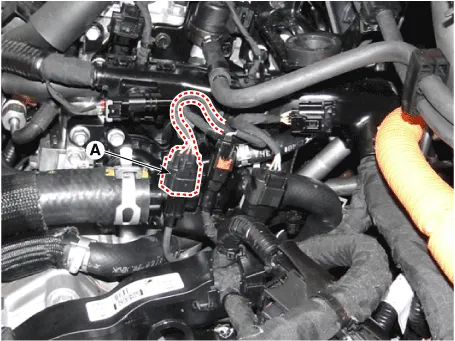
| 2. | Disconnect the crankshaft position sensor connector (A).
|
| 3. | Remove the engine room nuder cover. (Refer to Engine Mechanical System - "Engine Room Under Cover") |
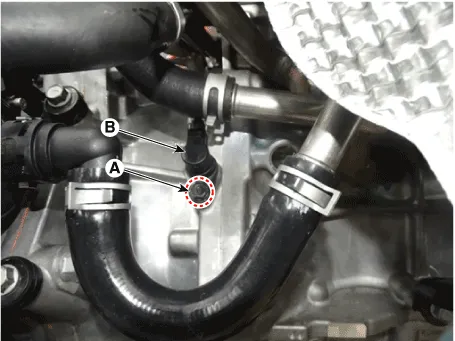
| 4. | Remove the crankshaft position sensor (B) after loosening the bolts (A).
|
| Installation |
|

|
|
| 1. | Install in the reverse order of removal.
|
Circuit Diagram
DescriptionCamshaft Position Sensor (CMPS) is a hall sensor and detects the camshaft position by using a hall element.It is related with Crankshaft Position Sensor (CKPS) and detects the piston position of each cylinder which the CKPS can't detect.
Other information:
Hyundai Ioniq (AE) 2017-2022 Service & Repair Manual: Rear Corner Radar Unit. Repair procedures
Removal1.Disconnect the negative (-) battery terminal.2.Remove the rear bumper.(Refer to Body - "Rear Bumper")3.Remove the rear corner radar unit (A) after loosening the mounting nuts. • Take care not to separate the bracket from rear bumper when removing the rear corner radar sensor.
Hyundai Ioniq (AE) 2017-2022 Service & Repair Manual: Parking Distance Warning (PDW) ON/OFF Switch. Repair procedures
Removal • Put on gloves to prevent hand injuries. • When removing with a flat-tip screwdriver or remover, wrap protective tape around the tools to prevent damage to components.
Categories
- Manuals Home
- Hyundai Ioniq Owners Manual
- Hyundai Ioniq Service Manual
- General Information
- How to Connect Portable Charger (ICCB: In-Cable Control Box)
- Engine Mechanical System
- New on site
- Most important about car
