Hyundai Ioniq (AE): High Voltage Battery Cooling System / Cooling Duct. Repair procedures
Hyundai Ioniq (AE) 2017-2022 Service & Repair Manual / Hybrid Control System / High Voltage Battery Cooling System / Cooling Duct. Repair procedures
| Removal |
|

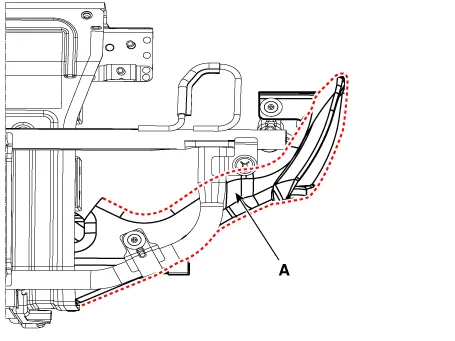
Cooling Duct (Inlet)
| 1. | Shut off the high voltage. (Refer to Hybrid Control System - "High Voltage Shut-off Procedures") |
| 2. | Remove the rear seat cushion. (Refer to Body - "Rear Seat Assembly") |
| 3. | Remove the rear door scuff trim. (Refer to Body - "Door Scuff Trim") |
| 4. | Remove the inlet cooling duct (A) after loosening the mounting fastener.
|
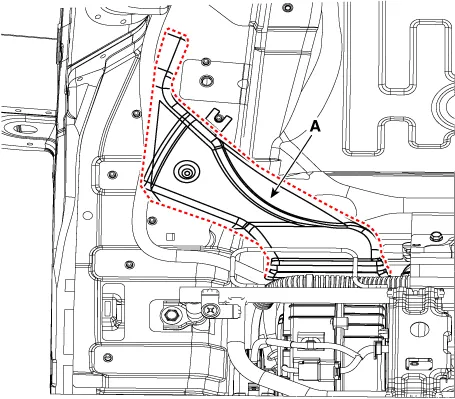
Cooling Duct (Outlet)
| 1. | Shut off the high voltage. (Refer to Hybrid Control System - "High Voltage Shut-off Procedures") |
| 2. | Remove the rear seat cushion. (Refer to Body - "Rear Seat Assembly") |
| 3. | Remove the rear door scuff trim. (Refer to Body - "Door Scuff Trim") |
| 4. | Remove the outlet cooling duct (A) after loosening the mounting nut.
|
| Installation |
|
| 1. | Install the cooling ducts in the reverse order of removal.
|
Removal • Be sure to read and follow the "General Safety Information and Caution" before doing any work related with the high voltage system.
Other information:
Hyundai Ioniq (AE) 2017-2022 Service & Repair Manual: Special service tools
Special Service Tools Tool Name / Number Illustration Description LKA Compensator(09964-C1100)Used for compensating front view camera unitBCW Sensor Correction Tool Set(09958-3T500)Used to correct the blind-spot radar unit.
Hyundai Ioniq (AE) 2017-2022 Service & Repair Manual: Components and components location
C
Categories
- Manuals Home
- Hyundai Ioniq Owners Manual
- Hyundai Ioniq Service Manual
- Theft-alarm System
- If the 12 Volt Battery is Discharged (Hybrid Vehicle)
- Maintenance
- New on site
- Most important about car

Copyright © 2026 www.hioniqae.com - 0.0103