
Hyundai Ioniq (AE): IMS(Integrated Memory System) / Memory power seat unit. Schematic diagrams
| Circuit Diagram |
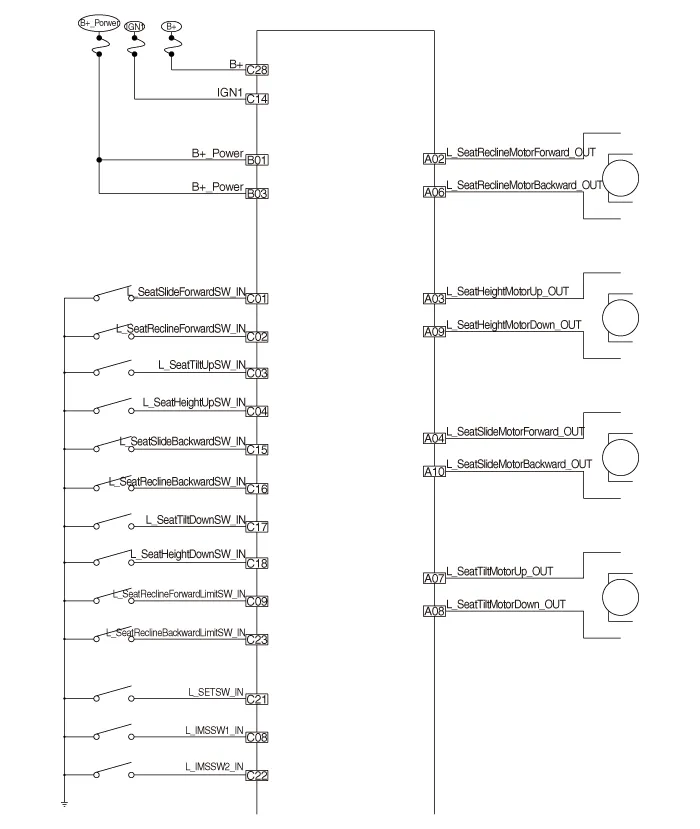

Components No Connecter A Connecter B Connecter C 1-Battery (+)Slide switch signal (Forward)2Reclining motor (Forward)GNDReclining switch signal (Forward)3Height motor (Up)Battery (+)Front tilt switch signal (Up)4Slide motor (Forward)-Reclining switch signal (Forward)5-GND-6Reclining motor (Backward) B-CAN (High)7Tilt motor (Up)B-CAN (Low)8Tilt motor (Down)IMS Switch 19Height motor (Down)Recline limit switch (Forward)10Slide motor (Backward)Slide sensor input11 Tilt sensor input12-13Position sensor (Power)14IGN 115Slide switch (Backward)16Recline switch (Backward)17Tilt switch (Down)18Height switch (Down)19-20Ground21 SET Switch22IMS Switch 223Recline limit switch (Backward)24Seat recline sensor25Seat height sensor (input)26-27-28Battery (+)
Removal1.Disconnect the negative (-) battery terminal.2.Remove the driver seat assembly.(Refer to Body - "Front Seat Assembly")3.Loosening the IMS unit mounting screws.
Other information:
Hyundai Ioniq (AE) 2017-2022 Service & Repair Manual: Heater Core. Repair procedures
Replacement1.Disconnect the negative (-) battery terminal. 2.Remove the heater and blower assembly.(Refer to Heater - "Heater Unit") 3.Loosen the mounting screws and remove the driver's temperature control actuator (A).4.Remove the heater core cover (A) after loosening the mounting screws.
Hyundai Ioniq (AE) 2017-2022 Service & Repair Manual: General safety information and caution
Safety PrecautionPrecautions To Take Before Servicing High Voltage System • Since hybrid vehicles contain a high voltage battery, if the high voltage system or vehicles are handled incorrectly, this might lead to a serious accidents like electric shock and electric leakage.
Categories
- Manuals Home
- Hyundai Ioniq Owners Manual
- Hyundai Ioniq Service Manual
- Jump starting procedure
- DCT(Dual Clutch Transmission) System
- Suspension System
- New on site
- Most important about car
