Hyundai Ioniq (AE): Cylinder Block / Rear Oil Seal. Repair procedures
| Removal |
|

| 1. | Remove the dual clutch transmission assembly. (Refer to Double Clutch Transmission (DCT) System - "Double Clutch Transmission (DCT)") |
| 2. | Remove the flywheel. (Refer to Cylinder Block - "Fly Wheel") |
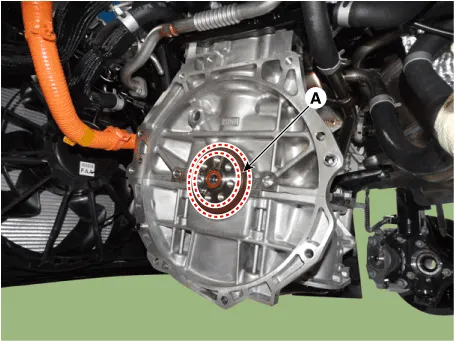
| 3. | Remove the rear oil seal (A).
|
| Installation |
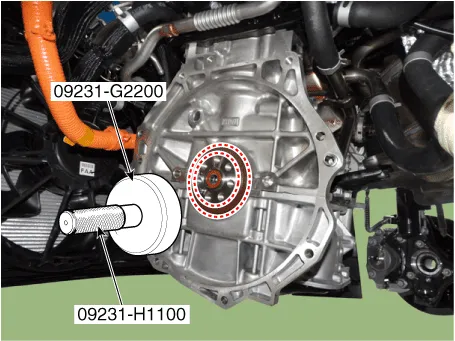
| 1. | Install a new rear oil seal.
|
| 2. | Install the flywheel. (Refer to Cylinder Block - "Fly Wheel") |
| 3. | Install the dual clutch transmission assembly. (Refer to Double Clutch Transmission (DCT) System - "Double Clutch Transmission (DCT)") |
Components1. Rear oil seal
Components1. Piston ring2. Piston3. Piston pin4. Connecting rod5. Connecting rod upper bearing6. Connecting rod lower bearing7. Connecting rod bearing cap
Other information:
Hyundai Ioniq (AE) 2017-2022 Service & Repair Manual: Mode Control Actuator. Repair procedures
Inspection1.Turn the ignition switch OFF.2.Disconnect the mode control actuator connector.3.Verify that the mode control actuator operates to the defrost mode when connecting 12V to terminal 3 and grounding terminal 4.Verify that the mode control actuator operates to the vent mode when connected in reverse.
Hyundai Ioniq (AE) 2017-2022 Service & Repair Manual: Rear Corner Radar Unit. Repair procedures
Removal1.Disconnect the negative (-) battery terminal.2.Remove the rear bumper.(Refer to Body - "Rear Bumper")3.Remove the rear corner radar unit (A) after loosening the mounting nuts. • Take care not to separate the bracket from rear bumper when removing the rear corner radar sensor.
Categories
- Manuals Home
- Hyundai Ioniq Owners Manual
- Hyundai Ioniq Service Manual
- If the 12 Volt Battery is Discharged (Hybrid Vehicle)
- DCT(Dual Clutch Transmission) System
- Heating, Ventilation and Air Conditioning
- New on site
- Most important about car
