Hyundai Ioniq (AE): Electric A/C Compressor / Schematic diagrams
| Connector Configurations |
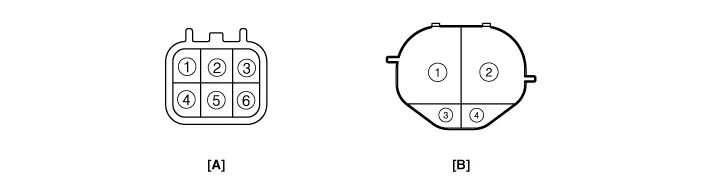
| Terminal Function |
|
Connector
|
Pin No.
|
Function
|
| A | 1 | 12V Power Ground |
| 2 | Climate CAN Low | |
| 3 | Interlock (-) | |
| 4 | 12V Power | |
| 5 | Climate CAN High | |
| 6 | Interlock (+) | |
| B | 1 | High Voltage Power |
| 2 | High Voltage Ground | |
| 3 | Compressor Interlock (-) | |
| 4 | Compressor Interlock (+) |
Components Location1. Electric A/C CompressorComponents1. Electric A/C Compressor inverter assembly2. Gasket3. Electric A/C Compressor body assembly
Troubleshooting
Other information:
Hyundai Ioniq (AE) 2017-2022 Service & Repair Manual: Blower Motor. Repair procedures
Inspection1.Connect the battery voltage and check the blower motor rotation.2.If the blower motor does not operate well, substitute with a known-good blower motor and check for proper operation.3.Replace the blower motor if it is proved that there is a problem with it.
Hyundai Ioniq (AE) 2017-2022 Service & Repair Manual: Repair procedures
Self Diagnosis1.Self-diagnosis process. • When operating the self-diagnostics, the below fault (self-diagnostics code) will blink at 0.5 seconds interval on the temperature display settings (driver's side only) and the remaining symbols are OFF .
Categories
- Manuals Home
- Hyundai Ioniq Owners Manual
- Hyundai Ioniq Service Manual
- Body (Interior and Exterior)
- Jump starting procedure
- Hybrid Control System
- New on site
- Most important about car

Copyright © 2026 www.hioniqae.com - 0.0252