Hyundai Ioniq (AE): AVN System / AVN(Audio Video Navigation) head unit. Repair procedures
| Removal |
| 1. | Disconnect the negative (-) battery terminal. |
| 2. | Remove the cluster fascia panal. (Refer to Body - "Center Fascia Panal") |
| 3. | Remove the crash pad garnish RH. (Refer to Body - "Crash Pad Garnish") |
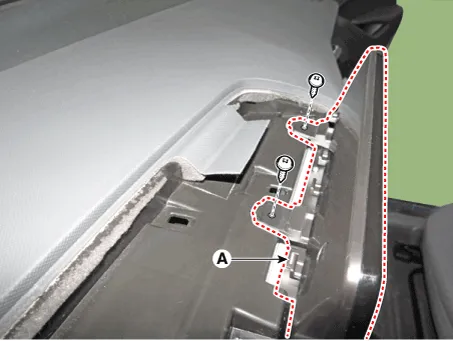
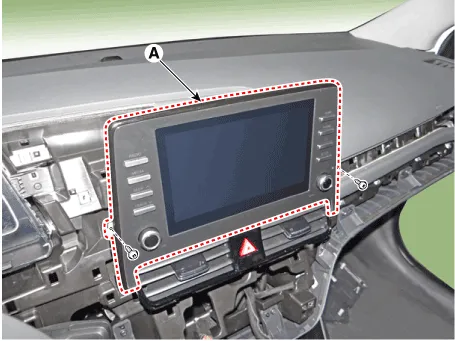
| 4. | Remove the AVN assembly (A) after loosening mounting screws.
|
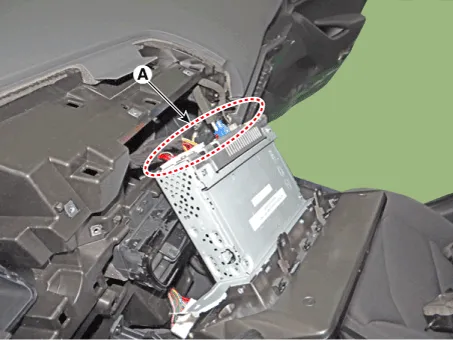
| 5. | Remove the AVN head unit after disconnecting the connectors and cable (A).
|
| Installation |
| 1. | Connect the AVN unit connectors and cable. |
| 2. | Install the AVN head unit. |
| 3. | Install the crash pad garnish RH. |
| 4. | Install the cluster fascia panal. |
| 5. | Connect the negative (-) battery terminal.
|

ComponentsConnector Pin Information No Connector A Connector B Connector C 1--B CAN (High)2-Mic signal (+)P CAN (High)3AMP NAVI VOICE (+)-IGN3 Wake up4AM SPDIF (High)--5-Antenna power-6Camera powerIllumination (+)-7Camera VideoMM Can (High)-8--B CAN (Low)9--P CAN (Low)10-Battery (+)-11DTCBattery (+)-12Steering wheel remote controlGround-13-Ground-14---15-Mic signal (-)-16---17AMP NAVI VOICE (-)--18AMP SPDIF (Low)--19AMP SPDIF GroundIllumination (-)-20Camera power groundMM Can (Low)-21Camera video ground--22-ACC23--24--25--26Steering wheel remote constrol ground-27--28--29--30--31--32--33Camera shield groundIGN 134--35--36-37-38Speed
Components NO Connector A NO Connector B 1BATT (+)1Subwoofer 2 (+)2BATT (+)2Subwoofer 1 (+)3BATT (+)3Front door tweeter speaker - RH (+)4BATT (+)4Front door tweeter speaker - LH (+)5-5-6Multimedia CAN (High)6-7Multimedia CAN (Low)7-8ACC8-9Navigation voice (+)9-10-10-11-11-12-12Rear door speaker - RH (+)13-13Rear door speaker - LH (+)14-14Center speaker (+)15-15 -16Ground16Subwoofer 2 (-)17Ground17Subwoofer 1 (-)18Ground18Front door tweeter speaker - RH (-) 19Ground19Front door tweeter speaker - LH (-)20SPDIF (High)20-21SPDIF (Low)21-22SPDIF GND22-23Navigation voice (-)23-24-24-25-25Rear door speaker - RH (-)26-26Rear door speaker - LH (-) 27-27Center speaker (+)28-28 -
Other information:
Hyundai Ioniq (AE) 2017-2022 Service & Repair Manual: Blower Motor. Repair procedures
Inspection1.Connect the battery voltage and check the blower motor rotation.2.If the blower motor does not operate well, substitute with a known-good blower motor and check for proper operation.3.Replace the blower motor if it is proved that there is a problem with it.
Hyundai Ioniq (AE) 2017-2022 Service & Repair Manual: Parking Distance Warning (PDW) ON/OFF Switch. Repair procedures
Removal • Put on gloves to prevent hand injuries. • When removing with a flat-tip screwdriver or remover, wrap protective tape around the tools to prevent damage to components.
Categories
- Manuals Home
- Hyundai Ioniq Owners Manual
- Hyundai Ioniq Service Manual
- Brake System
- Hybrid Control System
- Heating, Ventilation and Air Conditioning
- New on site
- Most important about car
