Hyundai Ioniq (AE): AHB(Active Hydraulic Boost) System / Repair procedures
| AHB Brake System Bleeding Procedure |
|

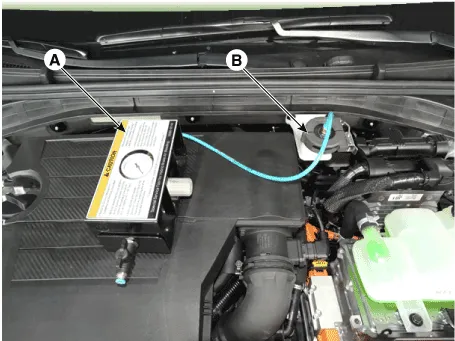
| 1. | Before installing the SST on the vehicle, close the airshut-off valve (A) to adjust the pressure gauge to thestandard value.
|
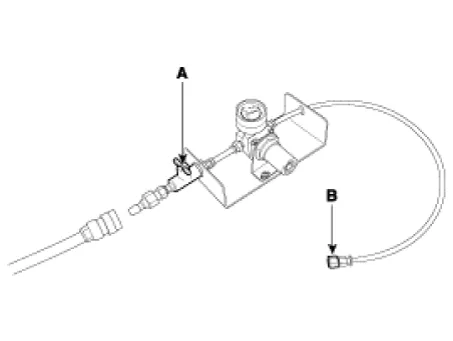
| 2. | After connecting an air hose and opening the airshut-off valve (A), adjust the pressure gauge (B) withto the standard value.
|
| 3. | close the air shut off valve (A) and remove the plug (B).
|
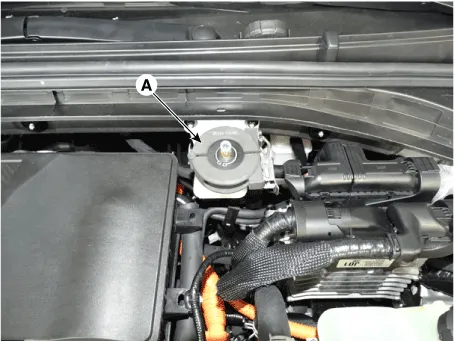
| 4. | Remove the brake reservoir tank cap. |
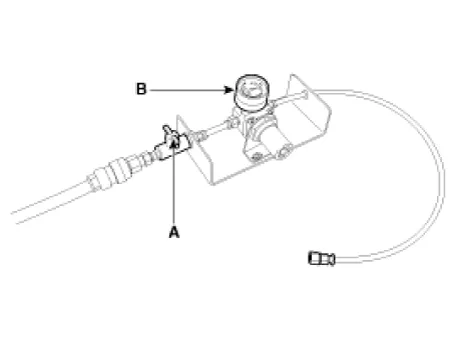
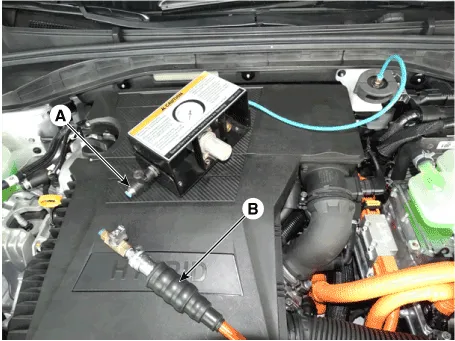
| 5. | Install the cap (A) of SST (0K585-E8100) on thereservoir tank.
|
| 6. | Make sure the check valve (A) is closed and connect SST (09580-3D100) (A) to the adapter (B).
|
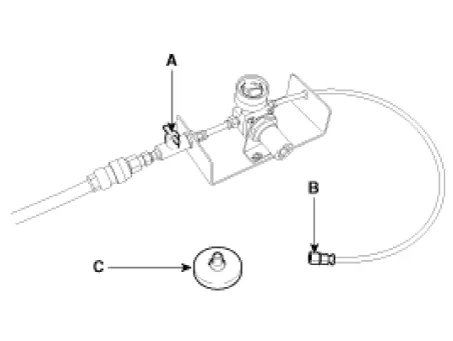
| 1. | To remove the SST (09580-3D100) from the vehicle,close the air shut-off valve (A) first.
|
| 2. | Remove SST (09580-3D100) and the cap of SST (0K585-E8100) on the reservoir tank.
|

| 3. | Inatall the brake reservoir tank cap. |
| Bleeding Step 1 (IBAU ECU OFF) |
|
| 1. | Disconnect the negative (-) battery terminal to turn off IBAU ECU. |
| 2. | Set the air bleeding tool (SST : 09580-3D100) and the cap of SST (0K585-E8100) to reservoir tank and make pressure (0.3 - 0.35 MPa (43.5 - 50.7 psi)) to it.
|

| 3. | Initiate air bleeding on all bleed screws in the following sequences until air bubbles no longer appear in the fluid. After air bleeding, close the bleed screws. ①IBAU (2 bleed srews) ② 4 wheels (RR -> RL -> FR -> FL)
|
| 4. | Perform air bleeding while stepping on the brake pedal and opening bleed screws; then, close bleed screws and release the brake pedal. Perform this procedure 10 times.
|
| Bleeding Step 2 (IBAU ECU ON) |
| 1. | Connect the negative (-) battery terminal to turn on IBAU ECU. |
| 2. | Start the engine. |
| 3. | Set the front wheels straight forward and the shift lever knob in Parking. |
| 4. | If the ESC function is completely turned off after about 3 seconds with the ESC Off switch held down, hold the ESC OFF switch and operate the brake pedal 10 times in full stroke. And then turn off the engine.
|
| 5. | Start the engine. And then press the ESC OFF switch for more than 3 seconds to enter ESC OFF mode.
|

| 6. | Use the air bleeding tool (SST : 09580-3D100, 0K585-E8100) and feed oil pressure 0.3 - 0.35 MPa (43.5 - 50.7 psi) into the reservoir. Loosen the bleed screws on 4 wheels; then, initiate air bleeding and close them while depressing the brake pedal half stroke continuously. Perform it 10 times; then, release the brake pedal. Bleed screw sequence : ③ 4 wheels
|
| 7. | Connect the GDS to the data link connector located underneath the dash panel and perform "Fluid Circulation Mode" on GDS. |
Terminal FunctionIBAU Connector Input / Output No Description No Description 1E/R Fuse & Relay Box(Multi Fuse - AHB)24Electric Parking Brake Switch(Auto Hold Swutch)2PSU Motor (+)25-3-26Parking Brake Switch4Shield Cable Ground27Rear Wheel Sensor LH (SIG)5E/R Fuse & Relay BoxPSU Motor (GND)28Front Wheel Sensor LH (SIG)6Brake Pedal Module (PDT PWR) 29Driver Door Switch7Brake Pedal Module (PDF PWR)30E/R Fuse & Relay Box(Multi Fuse - AHB 2)8E/R Fuse & Relay Box(Stop Signal Electronic Module)31Brake Pedal Module (PDF GND)9-32-10Brake Pedal Module (PDT GND)33Rear Wheel Sensor LH (VCC)11Shield Cable Ground34Rear Wheel Sensor RH (VCC)12-35-13PSU Motor (-)36Brake light switch14Ground 37-15-38C-CAN (High)16Crash Pad Switch (ESC OFF Switch)39C-CAN (Low)17Front Wheel Sensor LH (VCC)40Vehicle Speed :Smart Key Control Module, PCM18Front Wheel Sensor RH (VCC)41-19P-CAN (High)42Front Wheel Sensor RH (SIG)20P-CAN (Low)43Rear Wheel Sensor RH (SIG)21ESS Drive44Stop Lamp Switch22Brake Pedal Module (PDT SIG)45- 23Brake Pedal Module (PDF SIG)46Ground (GE06)
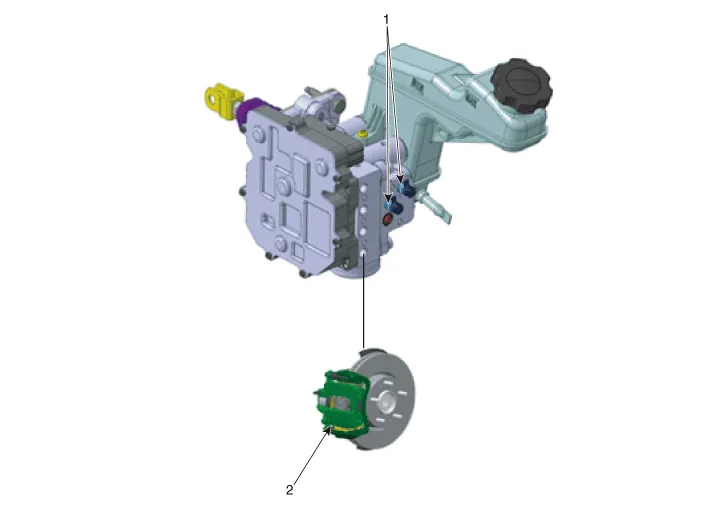
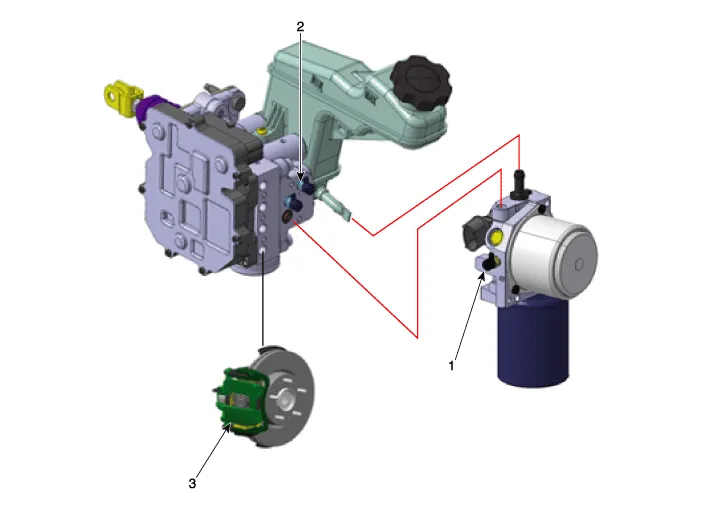
Components • IBAU (Intergrated Brake Actuation Unit) must not be disassembled.1. Intergrated Brake Actuation Unit (IBAU) ECU2.
Other information:
Hyundai Ioniq (AE) 2017-2022 Service & Repair Manual: Auto Defogging Sensor. Repair procedures
Diagnosis With GDS1.The heating, ventilation and air conditioning can be quickly diagnosed failed parts with vehicle diagnostic system (GDS).※ The diagnostic system (GDS) provides the following information.(1) Self diagnosis : Checking the failure code (DTC) and display.
Hyundai Ioniq (AE) 2017-2022 Service & Repair Manual: General safety information and caution
General Safety Information and CautionBe careful of the following precautions when driving the vehicle using the smart cruise control system. • The smart cruise control system may have limits in detecting distance to the vehicle ahead due to road and traffic conditions.
Categories
- Manuals Home
- Hyundai Ioniq Owners Manual
- Hyundai Ioniq Service Manual
- Jump Starting
- Engine Control/Fuel System
- Repair procedures
- New on site
- Most important about car
