Hyundai Ioniq (AE): Lighting System / DRL(Daytime Running Lights). Repair procedures
| Removal |
| 1. | Disconnect the negative (-) battery terminal. |
| 2. | Remove the front bumper. (Refer to Body - "Front Bumper Cover") |
| 3. | Disconnect the DRL connector. |
| 4. | Remove the bulb socket (B) and daytime running light bulb (A) from the lamp assembly.
|
| Installation |
| 1. | Install the DRL bulb socket. |
| 2. | Connect the DRL assembly connector. |
| 3. | Install the front bumper. |
| 4. | Connect the negative (-) battery terminal. |
Inspection1.Disconnect the negative (-) battery terminal.2.Remove the crash pad lower panel.(Refer to Body - "Crash Pad Lower Panel")3.Disconnect the rheostat switch connector (A).
Removal1.Disconnect the negative (-) battery terminal.2.Remove the license lamp (A) after disengaging the license lamp mounting clip (B).3.Replace the bulb (A) after removing a lens.
Other information:
Hyundai Ioniq (AE) 2017-2022 Service & Repair Manual: Heater Core. Repair procedures
Replacement1.Disconnect the negative (-) battery terminal. 2.Remove the heater and blower assembly.(Refer to Heater - "Heater Unit") 3.Loosen the mounting screws and remove the driver's temperature control actuator (A).4.Remove the heater core cover (A) after loosening the mounting screws.
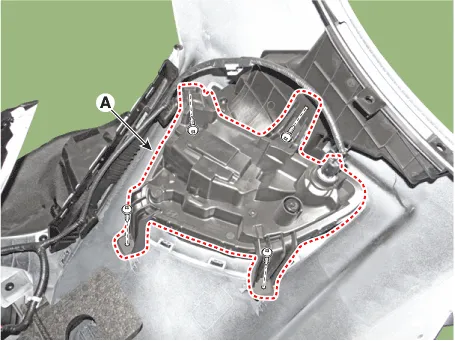
Hyundai Ioniq (AE) 2017-2022 Service & Repair Manual: Blower Unit. Repair procedures
Replacement When prying with a flat-tip screwdriver or use a prying trim tool, wrap it with protective tape, and apply protective tape around the related parts, to prevent damage.1.Disconnect the negative (-) battery terminal.2.Recover the refrigerant with a recovery / recycling / charging station.
Categories
- Manuals Home
- Hyundai Ioniq Owners Manual
- Hyundai Ioniq Service Manual
- If the 12 Volt Battery is Discharged (Hybrid Vehicle)
- How to Connect Portable Charger (ICCB: In-Cable Control Box)
- Engine Clutch System
- New on site
- Most important about car
