
Hyundai Ioniq (AE): AVN System / External AMP. Components and components location
| Components |
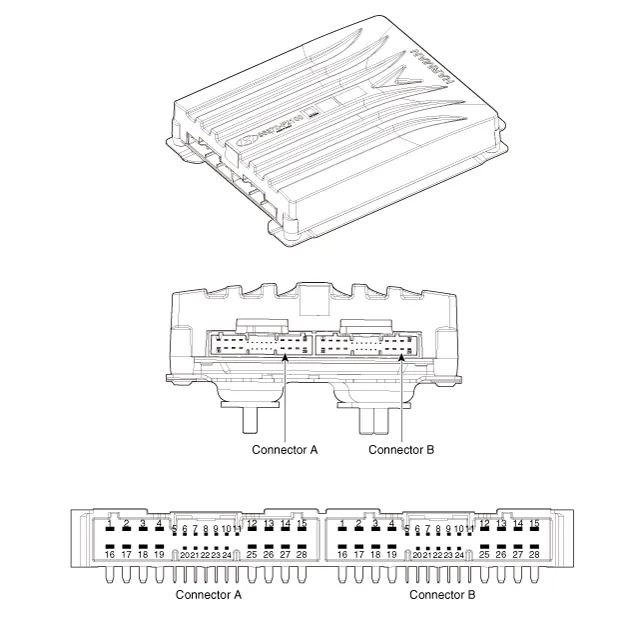
|
NO
|
Connector A
|
NO
|
Connector B
|
| 1 | BATT (+) | 1 | Subwoofer 2 (+) |
| 2 | BATT (+) | 2 | Subwoofer 1 (+) |
| 3 | BATT (+) | 3 | Front door tweeter speaker - RH (+) |
| 4 | BATT (+) | 4 | Front door tweeter speaker - LH (+) |
| 5 | - | 5 | - |
| 6 | Multimedia CAN (High) | 6 | - |
| 7 | Multimedia CAN (Low) | 7 | - |
| 8 | ACC | 8 | - |
| 9 | Navigation voice (+) | 9 | - |
| 10 | - | 10 | - |
| 11 | - | 11 | - |
| 12 | - | 12 | Rear door speaker - RH (+) |
| 13 | - | 13 | Rear door speaker - LH (+) |
| 14 | - | 14 | Center speaker (+) |
| 15 | - | 15 | - |
| 16 | Ground | 16 | Subwoofer 2 (-) |
| 17 | Ground | 17 | Subwoofer 1 (-) |
| 18 | Ground | 18 | Front door tweeter speaker - RH (-) |
| 19 | Ground | 19 | Front door tweeter speaker - LH (-) |
| 20 | SPDIF (High) | 20 | - |
| 21 | SPDIF (Low) | 21 | - |
| 22 | SPDIF GND | 22 | - |
| 23 | Navigation voice (-) | 23 | - |
| 24 | - | 24 | - |
| 25 | - | 25 | Rear door speaker - RH (-) |
| 26 | - | 26 | Rear door speaker - LH (-) |
| 27 | - | 27 | Center speaker (+) |
| 28 | - | 28 | - |
Removal1.Disconnect the negative (-) battery terminal.2.Remove the cluster fascia panal.(Refer to Body - "Center Fascia Panal")3.Remove the crash pad garnish RH.
Removal1.Disconnect the negative (-) battery terminal.2.Open the trunk, remove the right luggage side trim.(Refer to Body - "Luggage Side Trim")3.Remove the external amplifier after disconneting the connector (A) and loosening the mounting nuts.
Other information:
Hyundai Ioniq (AE) 2017-2022 Service & Repair Manual: In-car Sensor. Repair procedures
Diagnosis With GDS1.The heating, ventilation and air conditioning can be quickly diagnosed failed parts with vehicle diagnostic system (GDS).※ The diagnostic system (GDS) provides the following information.(1) Self diagnosis : Checking the failure code (DTC) and display.
Hyundai Ioniq (AE) 2017-2022 Service & Repair Manual: Repair procedures
Removal1.Disconnect the negative (-) battery terminal.2.Remove the tailgate lid trim.(Refer to Body - "TailGate Lid Trim")3.Disconnect the Rear view camera connector (A).4.Remove the Rear view camera assembly after loosening the mounting screws.Installation1.
Categories
- Manuals Home
- Hyundai Ioniq Owners Manual
- Hyundai Ioniq Service Manual
- If the 12 Volt Battery is Discharged (Hybrid Vehicle)
- Description and operation
- Repair procedures
- New on site
- Most important about car
