Hyundai Ioniq: Driveshaft and axle / Specifications
Hyundai Ioniq (AE) 2017-2025 Service Manual / Driveshaft and axle / Specifications
| Specification |
|
Engine
|
Transaxle
|
Joint type
|
Max. permissible angle
| ||
|
Outer
|
Inner
|
Outer
|
Inner
| ||
| HEV Kappa 1.6 GDI | 6 A/T | BJ#24 | CVTJ#24 | 46.5° | 23° |
| Tightening torque |
|
Item
|
N.m
|
kgf.m
|
lb-ft
| |
| Front | Hub nuts | 107.9 - 127.5 | 11.0 - 13.0 | 79.6 - 94.0 |
| Driveshaft caulking nut | 274.6 - 294.2 | 28.0 - 30.0 | 202.5 - 217.0 | |
| Strut assembly to knuckle | 156.9 - 176.5 | 16.0 - 18.0 | 115.7 - 130.2 | |
| Front caliper to knuckle | 98.1 - 117.7 | 10.0 - 12.0 | 72.3 - 86.8 | |
| Wheel speed sensor mounting bolt | 7.8 - 11.8 | 0.8 - 1.2 | 5.8 - 8.7 | |
| Disc fixing screw | 4.9 - 5.9 | 0.5 - 0.6 | 3.6 - 4.3 | |
| Lower arm to knuckle | 58.8 - 70.6 | 6.0 - 7.2 | 43.4 - 52.1 | |
| Tie rod end castle nut | 78.5 - 98.1 | 8.0 - 10.0 | 57.9 - 72.3 | |
| Rear | Wheel nut | 107.9 - 127.5 | 11.0 - 13.0 | 79.6 - 94.0 |
| Shock absorber upper mounting bolt | 49.0 - 63.7 | 5.0 - 6.5 | 36.2 - 47.0 | |
| Shock absorber lower mounting nut | 137.3 - 156.9 | 14.0 - 16.0 | 101.3 - 115.7 | |
| Brake caliper mounting bolt | 63.7 - 73.5 | 6.5 - 7.5 | 47.0 - 54.2 | |
| Wheel speed sensor mounting bolt | 8.8 - 13.7 | 0.9 - 1.4 | 6.5 - 10.1 | |
| Brake disc mounting bolt | 4.9 - 5.8 | 0.5 - 0.6 | 3.6 - 4.3 | |
| Hub assembly mounting bolt | 88.3 - 107.9 | 9.0 - 11.0 | 65.1 - 79.6 | |
| Upper arm mounting bolt & nut | 137.3 - 156.9 | 14.0 - 16.0 | 101.3 - 115.7 | |
| Lower arm mounting bolt & nut | 137.3 - 156.9 | 14.0 - 16.0 | 101.3 - 115.7 | |
| Assist armt mounting bolt & nut | 137.3 - 156.9 | 14.0 - 16.0 | 101.3 - 115.7 | |
| Trailing arm mounting bolt | 98.1 - 117.7 | 10.0 - 12.0 | 72.3 - 86.8 | |
 High voltage shut-off procedures
High Voltage Shut-off Procedures
•
Be sure to read and follow the "General Safety Information and Caution" before doing any work related with the high voltage system...

Other information:
Hyundai Ioniq (AE) 2017-2025 Service Manual: Repair procedures
InspectionAEB function ON / OFF switch was included to USM (User Setting Menu) and the state of the factory is ON.When the IGN On, maintain ON condition by default. And does not reflect the driver settings when next IGN On.If turned the ESC function Off, the AEB function is turned off...
Hyundai Ioniq (AE) 2017-2025 Service Manual: Side Airbag (SAB) Module. Description and operation
DescriptionThe Side Airbags (SAB) are installed inside the front seat and protects the driver and passenger from danger when side crash occurs. The SRSCM determines deployment of side airbag by using Side Impact Sensor (SIS) signal. • Never attempt to measure the circuit resistance of the airbag module (squib) even if you are using the specified tester...
Categories
- Manuals Home
- 1st Generation Ioniq Owners Manual
- 1st Generation Ioniq Service Manual
- Tilt Steering / Telescope Steering
- Washer Fluid
- Auto Door Lock/Unlock Features
- New on site
- Most important about car
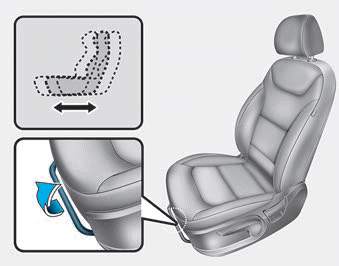
Manual adjustment
The front seat can be adjusted by using the levers located on the outside of the seat cushion. Before driving, adjust the seat to the proper position so that you can easily control the steering wheel, foot pedals and controls on the instrument panel.
Forward and rearward adjustment

Copyright © 2025 www.hioniqae.com