Hyundai Ioniq (AE): Fuel Delivery System / Filler-Neck Assembly. Repair procedures
Hyundai Ioniq (AE) 2017-2022 Service & Repair Manual / Engine Control/Fuel System / Fuel Delivery System / Filler-Neck Assembly. Repair procedures
| Removal |
| 1. | Turn the ignition seitch OFF and disconnect the battery negative (-) cable. |
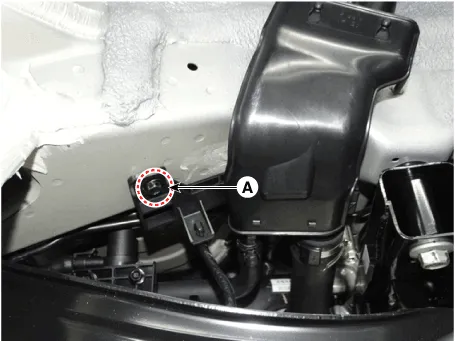
| 2. | Open the fuel filler door and then remove the filler-neck installation screw (A).
|

| 3. | Lift the vehicle. |
| 4. | Remove the rear-LH wheel, tire, and the inner wheel house. |
| 5. | Disconnect the fuel filler hose (A) and the leveling hose (B). |
| 6. | Disconnect the vent tube quick-connector (C).
|
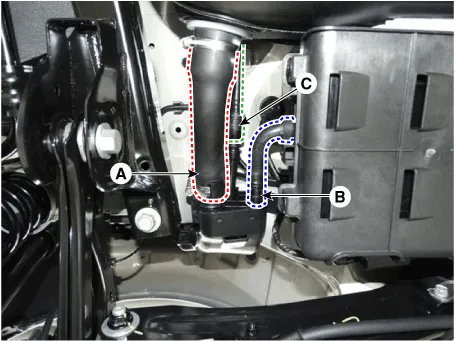
| 7. | Remove the filler-neck assembly from the vehicle after removing the bracket installation bolt (A).
|
| Installation |
| 1. | Install in the reverse order of removal.
|
Removal1.Release the residual pressure in fuel line. (Refer to Fuel Delivery System - "Release Residual Pressure in Fuel Line")2.Turn the ignition switch OFF, and then remove battery (-) cable.
Removal 1.Turn the ignition seitch OFF and disconnect the battery negative (-) cable. 2.Disconnect the accelerator position snesor connector (A).3.Remove the installation nut (A), and then remove the accelerator pedal module.
Other information:
Hyundai Ioniq (AE) 2017-2022 Service & Repair Manual: Ambient Temperature Sensor. Components and components location
C
Hyundai Ioniq (AE) 2017-2022 Service & Repair Manual: Auto Defoging Actuator. Repair procedures
Inspection1.Turn the ignition switch OFF. 2.Disconnect the auto defogging connector. 3.Verify that the auto defogging actuator operates to the open position when connecting 12V to terminal 3 and grounding terminal 4. Verify that the auto defogging actuator operates to the close position when connected in reverse.
Categories
- Manuals Home
- Hyundai Ioniq Owners Manual
- Hyundai Ioniq Service Manual
- Transmission Gear Oil. Repair procedures
- How to Connect Portable Charger (ICCB: In-Cable Control Box)
- If the 12 Volt Battery is Discharged (Hybrid Vehicle)
- New on site
- Most important about car

Copyright © 2026 www.hioniqae.com - 0.0126