Hyundai Ioniq: Inhibitor Switch / Repair procedures
| •
| Thoroughly check connectors for looseness, poor connection, bending, corrosion, contamination, deterioration, or damage. |
|
Inspection flow
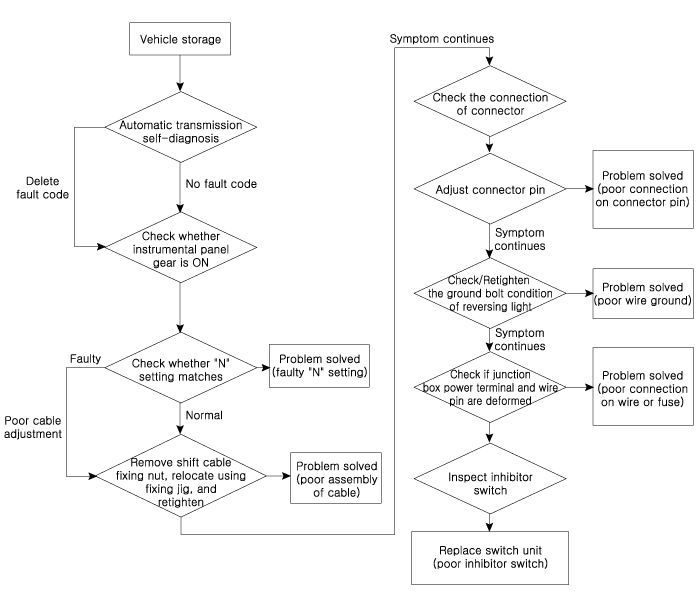
Items to check
| 2. | Inspect whether N setting matches. | –
| Adjust N setting (Refer to Dual Clutch Transmission Control System - "Inhibitor Switch"). |
|
| 3. | Inspect shift cable separation. | –
| Adjust shift cable separation (Refer to Dual Clutch Transmission Control System - "Inhibitor Switch"). |
|
| 4. | Inspect whether connector is connected. | –
| Inspect connector thoroughly for looseness, poor connection, bending, corrosion, contamination, deformation, or damage. |
| –
| Turn ignition key "ON" and engine "OFF" and measure the power supplied to inhibitor switch circuit and voltage between ground. Specification : approx. 12 V |
|
| –
| Fix the pin wiring when connector pin wiring is faulty (Refer to ETM - "Wiring Repair"). |
|
| 5. | Inspect ground condition on reversing light circuit. | –
| Check the ground location of reversing light (Refer to ETM - "Harness Location Map"). |
| –
| Reattach reversing light if ground condition is faulty. |
|
| 6. | Inspect wiring connection on junction box power terminal and fuse lamp. | –
| Check whether fuse holder is separated and holder is holding the fuse tight. 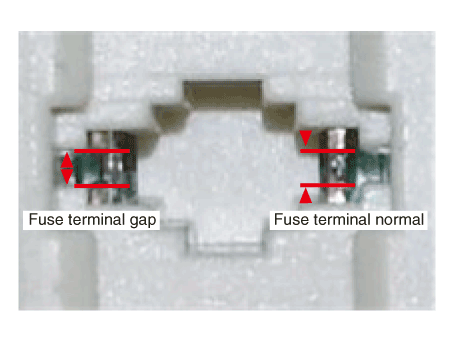
|
| –
| Attach tester fuse to check if it is connected appropriately. 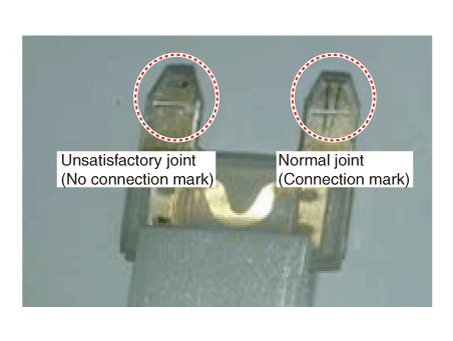
|
| –
| Check whether fuse capacity is appropriate for each circuit. |
| –
| Check if fuse is damaged. |
| –
| Check pulling of fuse fixing wiring, inflow of foreign substance, and arrangement condition of terminal. |
| –
| Relocate the terminal that has been pulled and inspect using the method explained above. |
| –
| When problem is not solved, refer to the circuit diagram wiring repair instructions to fix or replace the terminal. |
|
| 7. | Inspect inhibitor switch signal. | –
| Turn ignition key "ON" and engine "OFF". |
| –
| Measure the voltage between each terminal and chassis ground when shifting lever to "P, R, N, D" range. Specified value: refer to specification "signal code" table |
|
|
| •
| Be sure to read and follow the "General Safety Information and Caution" before doing any work related with the high voltage system. Failure to follow the safety instructions may result in serious electrical injuries. |
|
| •
| Use fender covers to avoid damaging painted surfaces. |
| •
| To avoid damage, unplug the wiring connectors carefully while holding the connector portion. |
|
| 1. | Shut off the High Voltage circuit. (Refer to General Information - "High Voltage Shutoff Procedure") |
| 2. | Remove the engine room under cover. (Refer to Engine And Transaxle Assembly - "Engine Room Under Cover") |
| 3. | Loosen the drain plug, and drain the inverter coolant. Remove the reservoir cap to help drain the coolant faster. (Refer to Hybrid Motor System - "Coolant") |
| 4. | Remove the HPCU (Hybrid Power Control Unit). (Refer to Hybrid Control System - "Hybrid Power Control Unit (HPCU)") |
| 5. | Remove the ECM (Engine Control Module) and TCM (Transmssion Control Module). (Refer to Engine Control/Fuel System - "Engine Control Module (ECM)") (Refer to Dual Clutch Control System - "DCT Control Module (TCM)") |
| 6. | Remove the HPCU (Hybrid Power Control Unit) tray. (Refer to Hybrid Control System - "Hybrid Power Control Unit (HPCU)") |
| 7. | Make sure vehicle does not roll before setting shift lever to "N" position. |
| 8. | Disconnect the inhibitor switch extension connector (A). |
| 9. | Remove the shift cable mounting nut (B). 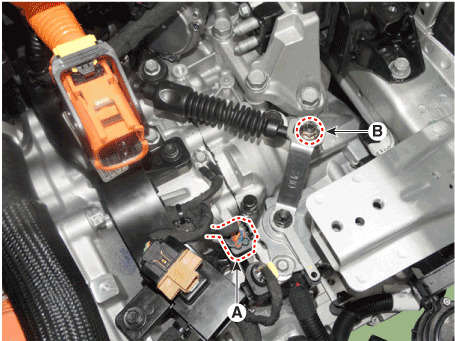
|
| 10. | Remove the manual control lever (A) and the washer after removing a nut (B). 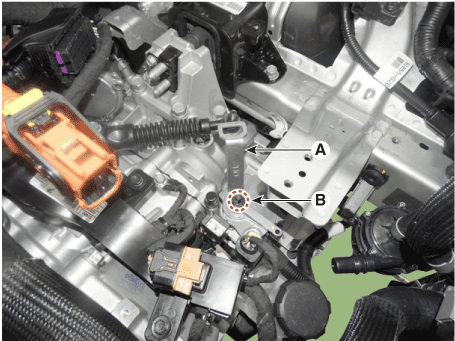
|
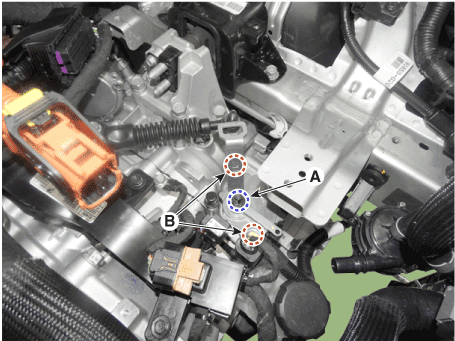
| 11. | Remove the inhibitor assembly (A) after removing the bolts (B-2ea). 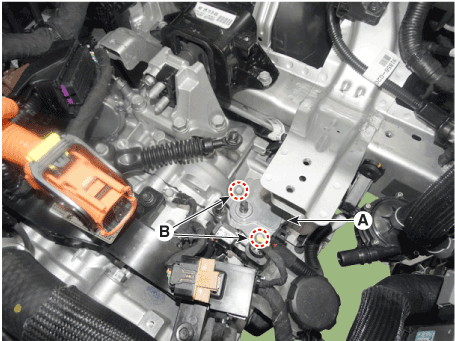
|
| 12. | Remove the extension connector (A) from the inhibitor switch 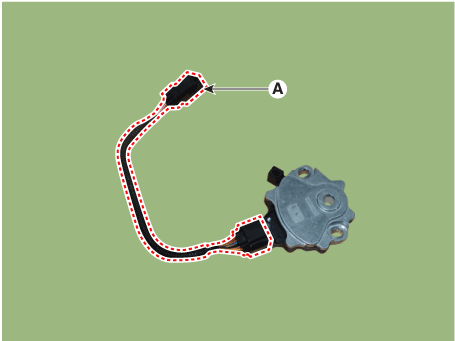
|
| 1. | Check that the shift lever is placed in the "N" position. |
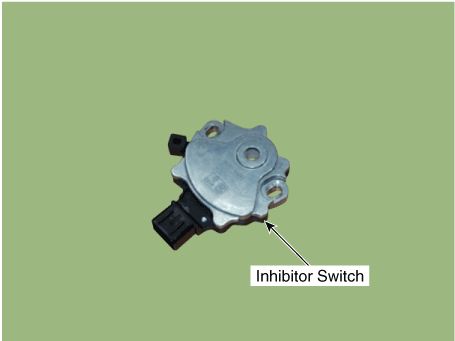
| 2. | Lightly tighten the inhibitor switch mounting bolts (B) after installing the inhibitor switch (A).
|
| 3. | Lightly tighten the manual control lever mounting nut (B) after installing the manual control lever (A).
|
| 4. | Align the hole (A) in the manual control lever with the "N" position hole (B) of the inhibitor switch and then insert the inhibitor switch guide pin (SST No.:09480-A3800). 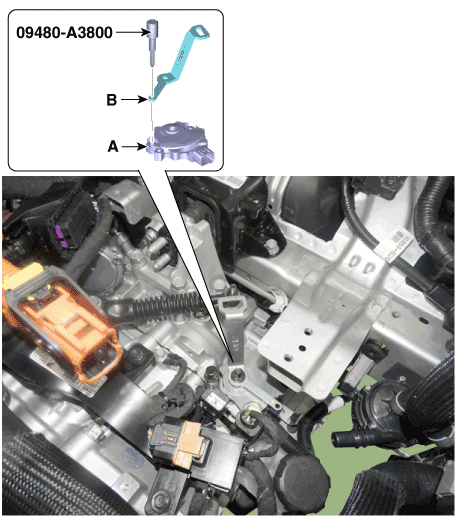
|
| 5. | Tighten the manual lever mounting nut (A) to the specified torque. Tightening torque : 17.7 - 24.5 N.m (1.8 - 2.5 kgf.m, 13.0 - 18.1 lb-ft) |
|
| 6. | Tighten the inhibitor switch mounting bolts (B) to the specified torque. Tightening torque : 9.8 - 11.8 N.m (1.0 - 1.2 kgf.m, 7.2 - 8.7 lb-ft) |
|
| 7. | Lightly tighten the nut (B) after connected the shift cable (C) in the manual control lever (D). |
| 8. | Tighten the nut (B) after Push shift cable (C) lightly to "F" direction shown to eliminate free play of shift cable. Tightening torque : 9.8 - 13.7 N.m (1.0 - 1.4 kgf.m, 7.2 - 10.1 lb-ft) |
|
| 9. | Connect the inhibitor switch connector (A). 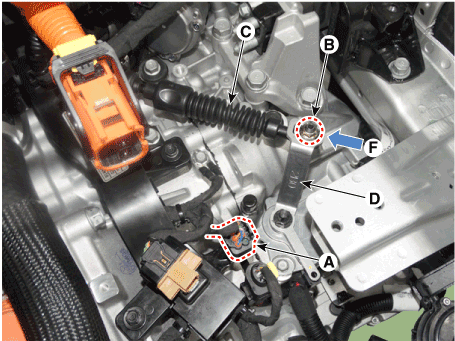
|
| 10. | Remove the inhibitor switch guide pin (SST No. : 09480-A3800) from the hole. |
| 11. | Install the engine room under cover. (Refer to Engine Mechanical System - "Engine Room Under Cover") |
| 12. | Install the HPCU (Hybrid Power Control Unit) tray. (Hybrid Control System - "HPCU") |
| 13. | Install the ECM (Engine Controm Module) and TCM (Transmission Control Module) (Refer to Engine Control/Fuel System - "ECM") (Refer to Dual Clutch Control System - "TCM") |
| 14. | Install the HPCU (Hybrid Power Control Unit). (Hybrid Control System - "HPCU") |
| 15. | Bleed air from the hybrid motor cooling system using the GDS. (Refer to Hybrid Motor System- "Coolant") | •
| Check that operating surely at each range of the inhibitor switch corresponding to each position of shift lever. |
|
|
Other information:
Turn Signal Indicator Light
This indicator light blinks:
• When you operate the turn signal indicator light.
If any of the following occurs, there may be a malfunction with the turn signal
system.
- The turn signal indicator light illuminates but does not blink
- The turn signal indicator light blinks rapidly
- The turn signal indicator light does not illuminate at all
If either of these conditions occur, have your vehicle inspected by an authorized
HYUNDAI dealer...
Component Location1. Head lamp (Low)2. Head lamp (High)3. Position lamp4. Turn signal lamp5. Daytime Running Light (DRL)6.Turn signal lamp (Door mirror)7. Vanity lamp8. Map lamp1. Tail lamp2. Tail lamp/Stop lamp3. Back up lamp4. Turn signal lamp5. Stop lamp6...
Categories
The Driver Position Memory System is provided to store and recall the following
memory settings with a simple button operation.
- Driver's seat position
- Side view mirror position
- Instrument panel illumination intensity
read more


 Troubleshooting
